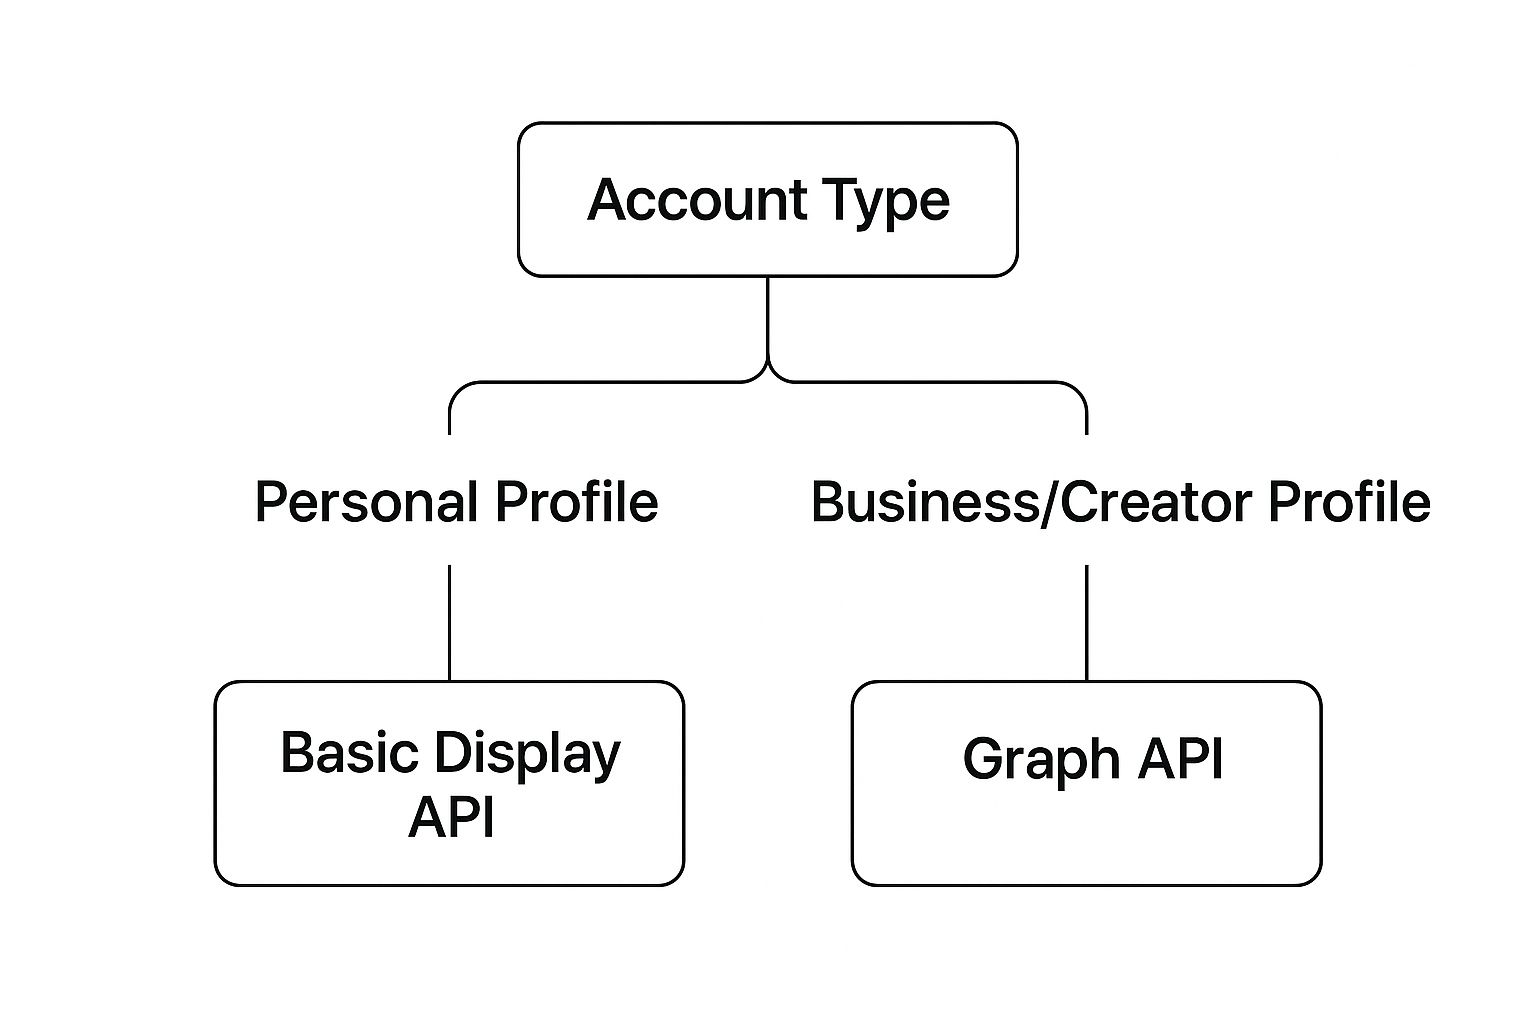
Before you write a single line of code, it's critical to grasp one key fact: there isn't just one "Instagram API." There are two, and they're built for completely different jobs. You have the powerful Instagram Graph API for businesses and creators, and the much simpler Basic Display API for personal use cases.
Picking the right one from the get-go is the most important first step you'll take.
Choosing the Right Instagram API for Your Project
Think of it like choosing between a professional chef's kitchen and a simple vending machine. Both give you access to "food" (in this case, data), but what you can create, the ingredients you have, and the complexity involved are worlds apart. Your choice depends entirely on what you're trying to accomplish.
The Instagram Graph API is the fully-stocked professional kitchen. It's designed specifically for Instagram Business and Creator accounts, giving you a massive toolkit to manage a public presence at scale. Developers tap into this API to publish photos and videos, handle comments, pull detailed engagement metrics, and even analyze audience demographics. If your project involves analytics, content scheduling, or community management, this is your only real option.
On the other hand, the Basic Display API is like the vending machine. It does one simple thing really well: it lets you grab basic profile information and media from any type of Instagram account, including personal ones. It's purely read-only access to a user's photos and videos. This API is perfect for apps that just need to display an Instagram feed on a personal website or create a simple photo gallery. That's it. It can't publish content, and it won't give you any deep analytics.
Making Your Decision
The deciding factor really boils down to the type of Instagram account you need to work with. If your app is for businesses and creators who need serious management tools, the Graph API is the only path forward. If you just need to show content for a user, the Basic Display API is all you need.
This decision tree breaks down the logic pretty clearly.
As you can see, the functionality you need is directly tied to whether the account is personal or professional. Getting this right from the start saves you from wasting hours of development time on an API that simply can't do what you need it to. This idea of specialized APIs isn't unique to Instagram; you can get a broader look at various social media API options to see how different networks approach data access.
To make it even clearer, here’s a quick side-by-side comparison.
Instagram Graph API vs Basic Display API at a Glance
This table should help you quickly decide which API fits your project's needs.
| Feature | Instagram Graph API | Basic Display API |
|---|---|---|
| Primary Use Case | Business & Creator management | Displaying personal content |
| Supported Accounts | Business & Creator | Personal & Business |
| Publishing Content | Yes (Photos, Videos, Stories) | No (Read-only) |
| Comment Management | Yes (Read, post, delete) | No |
| User Insights | Yes (Demographics, reach) | No |
| Hashtag Search | Yes | Yes (Limited) |
| Mentions | Yes | No |
| Business Discovery | Yes | No |
| Authentication | Facebook Login | Instagram Login |
Ultimately, choosing the right tool for the job ensures your project is built on a solid foundation, staying in line with Instagram's rules and hitting your application's goals.
The most common mistake I see developers make is trying to use the Basic Display API for business functions like moderating comments or pulling analytics. Just remember: Basic Display is for showing content, while the Graph API is for managing it.
How the Instagram Graph API Really Works

To get a real feel for the Instagram Graph API, stop thinking about lists and tables. Instead, picture a massive, invisible web of social connections. This web isn't made of cities and roads, but of people, their photos, the comments they leave, and the hashtags they use. The Graph API is your GPS for navigating this map.
This whole structure is built on top of the even bigger Facebook Graph API. It all boils down to two simple but incredibly powerful ideas: nodes and edges.
- Nodes are the "things" on this map. A user's profile is a node. A single photo they posted is another node. Even a comment or a story is its own distinct node.
- Edges are the connections between these things. The relationship between a photo and all its comments is an edge. The link from a user's profile to all their photos is another edge.
So, when you send a request to the API, you aren't just asking for a list. You're telling it: "Start at this user node, then follow the 'media' edge to find all their photos." It's a much more intuitive and flexible way to pull exactly the data you need without grabbing a bunch of junk you don't.
The Key Components of an API Call
To navigate this social map, you need three things: a destination, a key to get in the door, and a list of what you're allowed to touch once you're inside. In API terms, these are the endpoint, the access token, and the permission scopes.
An access token is basically a temporary digital keycard. It’s a long, cryptic string of characters that proves your app has permission from a user to access their data. You have to include this token with every single API request—it's the foundation of the whole security model.
But this keycard doesn't unlock everything. Its power is limited by scopes, which are the specific permissions the user agreed to when they connected your app. They'll see a screen asking for things like instagram_basic (to see their profile and posts) or instagram_manage_comments (to post comments for them).
Think of scopes as defining which doors your keycard can open. You might have permission to view a user's media (
instagram_basic), but you can't post comments on their behalf unless they've also granted you theinstagram_manage_commentsscope. This gives users fine-grained control over their own data.
The last piece of the puzzle is the endpoint. This is the specific URL you send your request to. For instance, to get basic information about the user who authenticated, you’d hit the /me endpoint. To get their photos and videos, you’d target the /me/media endpoint.
Putting It All Together
Let's walk through a quick, practical example. Say you want to fetch the five most recent photos from a user's Instagram account after they've logged into your app.
- Authentication: Your app sends the user through Instagram's login flow, where they see exactly what permissions you’re asking for and click "Allow."
- Token Generation: Once they approve, the API sends your app a short-lived access token. It's your keycard for this user.
- API Request: You then build an API call to the
/me/mediaendpoint. In that request, you include the access token and can add parameters to specify you only want theidandcaptionfor each post, and you only want five of them. - Data Response: The API checks your token, confirms you have the right permissions, and sends back a clean JSON object with the requested data for their last five posts.
This entire dance is built around privacy and security. No app can get its hands on user data without explicit consent, and even then, its access is strictly limited to what the user approved. It's this structured, permission-based system that makes the Instagram API such a reliable and powerful tool for developers.
Securing Access with Authentication and Permissions

Tapping into the Instagram API isn't like walking through an open door. It's a secure, multi-step handshake designed to protect user data above all else. The entire system is built on OAuth 2.0, an industry-standard framework that lets your app act on a user's behalf without ever handling their password.
Think of it like giving a valet a special key for your car. This key can start the engine and move the car, but it can't open the glove box or the trunk. The user (the car owner) grants your app (the valet) a specific, limited set of permissions to perform only the actions it needs to.
This process gives users total control and transparency over what data an app can see and do. At the center of it all is the access token—a temporary, secure credential your app gets once a user gives their approval.
The OAuth 2.0 Authorization Flow
Getting that access token is a clear, predictable dance between your application, the user, and the Instagram API. It’s a dialogue that establishes trust and confirms permissions every step of the way.
Here’s how it works in a nutshell:
App Registration: First things first, you have to register your app on the Meta for Developers platform. This is where you get your unique App ID and App Secret, which act like your application's username and password.
User Authorization Request: Your app sends the user to an Instagram authorization URL. This link includes your App ID and the specific scopes (permissions) you're asking for, like
instagram_basicorinstagram_manage_comments.User Consent: The user sees a clear consent screen showing your app's name and exactly what it wants to do. They have a simple choice: "Allow" or "Deny."
Authorization Code: If they click "Allow," Instagram sends them back to your app with a temporary authorization code. This code is short-lived and single-use.
Token Exchange: Now, your app's backend takes this code—along with your App ID and App Secret—and sends it back to the Instagram API in a secure, server-to-server call.
Access Token Granted: The API validates everything. If it all checks out, it issues an access token. Your app can now use this token to make authorized API calls for that user.
This back-and-forth ensures only authenticated apps with explicit user consent can ever touch the Instagram API.
Understanding Permissions and Scopes
Scopes are the heart of the API's security model. They draw the exact lines around what your application is allowed to do. It’s critical that you only request the permissions absolutely essential for your app to function.
Requesting too many permissions is a one-way ticket to getting your app rejected during Meta's review. The golden rule is the principle of least privilege: only ask for what you absolutely need to deliver your app's core features.
For example, an app that just displays a user's media feed only needs the instagram_basic scope. It has no business asking for instagram_manage_insights or instagram_manage_comments. Doing so is a major red flag for both users and Meta's review team, and rightfully so.
Managing Token Lifecycles
Access tokens don't last forever, and that's by design. They expire. This is a crucial security feature that minimizes the risk if a token is ever compromised. Short-lived tokens typically last for about an hour, while you can get long-lived tokens that are good for up to 60 days.
Your application must be built to handle this reality. A solid integration needs logic to:
- Securely Store Tokens: Never, ever expose access tokens on the client-side (like in a web browser or mobile app). They belong on your server, stored securely.
- Refresh Expired Tokens: Before a long-lived token expires, use the API to exchange it for a fresh one. This ensures your app keeps working for the user without interruption.
- Handle Revoked Access: Users can revoke your app's permissions from their Instagram settings at any time. Your app needs to handle this gracefully when its API calls suddenly start failing.
By mastering this authentication flow and properly managing your tokens, you can build reliable, trustworthy applications that respect user privacy while unlocking the immense power of the Instagram API.
Putting the Instagram API to Work with Key Endpoints

Alright, you've handled authentication. Now for the fun part: putting the API to work. The real muscle of the Instagram API lies in its endpoints—specific URLs you query to fetch data, publish content, or manage interactions.
Think of these endpoints like different departments in a massive library. Each one is responsible for a specific type of information. Instead of just giving you a dry list, let’s walk through the most valuable endpoints using real-world scenarios. This will show you not just what they do, but how you can use them to build anything from a slick analytics dashboard to an automated moderation bot.
Fetching User and Media Data
The most common starting point is simply pulling information about a user and their posts. The /me and /me/media endpoints are the absolute workhorses here, forming the foundation of countless apps that display Instagram feeds or track content performance.
Your first stop is almost always the /me endpoint. It grabs the profile information for the Instagram Business or Creator account that authorized your app. This is perfect for personalizing the user experience in your tool or just verifying an account's identity.
A simple call looks something like this:
curl -i -X GET "https://graph.facebook.com/v19.0/me?fields=id,username,followers_count&access_token={your-access-token}"
This request asks for the user’s ID, username, and their follower count. The API returns a clean JSON object with exactly what you asked for, making it dead simple to parse and use in your application.
From there, you can dig into their actual content with the /me/media endpoint. This is how you get all the photos, videos, Reels, and carousels an account has published. You can specify exactly which details you need for each media item, like its caption, timestamp, like count, and comment count.
For example, if you wanted to grab the last 10 posts along with their key engagement metrics, you'd do this:
curl -i -X GET "https://graph.facebook.com/v19.0/me/media?fields=id,caption,media_type,like_count,comments_count,timestamp&limit=10&access_token={your-access-token}"
That single API call gives you all the raw data you need to power a content analytics dashboard, monitor performance over time, or even build a "latest posts" widget for a website. The potential is massive. By January 2025, Instagram ads reached an estimated 1.74 billion users worldwide, making the data you can access through this API incredibly valuable. You can learn more about Instagram’s impressive global reach on DataReportal.
Managing Comments and Community Interaction
The API isn't just for reading data; it lets you actively manage your community. The ability to read, reply to, and delete comments is a game-changer for brands and creators who want to automate moderation and engage with their audience at scale.
This is all handled through the media-specific comments endpoint: /{media-id}/comments.
Imagine you’re building a tool to automatically hide comments with certain keywords or flag them for a human to review. Your app would first fetch the media, then loop through each post's comments to analyze the text.
Pro Tip: This is where webhooks are a lifesaver. Instead of constantly asking the API for new comments (which chews through your rate limit), you can set up a webhook. It'll send your app a real-time notification the instant a new comment is posted.
You can also post replies directly through the API. This is huge for customer service. You could build tools that automatically answer common questions or assign support conversations to different team members.
Uncovering Insights and Analytics
For any serious business or creator, performance data is everything. The Instagram API provides powerful insights endpoints that go way beyond simple likes and comments. These endpoints give you aggregated, privacy-safe data about your account's reach, impressions, and even audience demographics.
The /me/insights endpoint delivers data at the account level. You can request high-level metrics like:
reach: The number of unique accounts that saw your content.impressions: The total number of times your content was displayed.profile_views: How many times your profile was visited.follower_count: Your follower growth over a given period.
For a more granular view, you can get insights on individual media items using the /{media-id}/insights endpoint. This lets you pinpoint which specific posts are driving the most engagement or reaching the widest audience. By combining these two endpoints, you can build a complete picture of what content truly resonates with your followers and use that hard data to guide your content strategy.
Navigating Rate Limits and Privacy Compliance
Building a great application with the Instagram API isn't just about clever code—it's about playing by the rules. The two biggest hurdles you'll face are rate limits and data privacy compliance. Nail these, and you'll build an app that's not just powerful, but also scalable, sustainable, and trustworthy.
Think of the API as giving your app a "call budget" for each user. This budget refreshes over a rolling time window. Every time you ask for data, you spend a little of that budget. If you burn through it too fast by making too many requests, the API will temporarily shut you down. That's rate limiting in a nutshell.
Understanding Your API Call Budget
The Instagram Graph API doesn't use a simple, fixed number of calls. Instead, it uses a more sophisticated, business logic-based system where the "cost" of an API call depends on how complex it is and the resources it requires. A simple request for a username might cost 1 call, but fetching a boatload of detailed media insights will cost a whole lot more.
Your app's total call allowance is dynamic, calculated from the number of active users who have connected their accounts. This means your budget grows as your user base does. The real trick is designing your application to be incredibly efficient with every single call.
The fastest way to blow through your rate limit is constant polling—repeatedly hammering the API with "is there anything new yet?" A far smarter approach is to use webhooks. This lets the API tell you when something interesting happens, saving your call budget for when it really matters.
Strategies for Efficient API Usage
Staying within your rate limits is about working smarter, not harder. Here are a few essential strategies to live by:
- Cache Your Data: Don't ask for the same information over and over again. Store the data you've already pulled and only request an update when it's absolutely necessary.
- Embrace Webhooks: For anything real-time, like new comments or mentions, webhooks are non-negotiable. They are infinitely more efficient than polling.
- Batch Your Requests: Whenever you can, bundle multiple queries into a single API call to cut down on the overhead.
- Monitor Your Usage: Keep a close watch on your app's API call volume in the Meta Developer Dashboard. This lets you spot potential problems before they bring your service to a halt.
To get deeper into the weeds, check out these API rate limit best practices for building more resilient integrations. This API Rate Limit: A Developer's Survival Guide also offers some great external context on the topic.
A Privacy-First Design
Beyond the technical guardrails, the Instagram API is fundamentally built around user privacy. This isn't just a friendly suggestion; it's a core principle enforced by the mandatory Meta App Review process. Before your app can go live to the public, you have to justify every single permission you request and show exactly how you'll use the data you collect.
This focus on privacy is baked right into the API's design. The API's evolution has been shaped by Meta's push to balance business utility with user protection. For instance, the API now restricts follower metrics for accounts with fewer than 100 followers, a clear move to protect the data of smaller, more personal accounts. Demographic metrics are also handled with care, showing only the top 45 audience segments and introducing a reporting delay of up to 48 hours to anonymize user information.
Ultimately, building a successful application means being a good steward of user data. By respecting rate limits and championing privacy best practices, you create an integration that isn't just functional but also fully compliant and worthy of your users' trust.
Building Smarter Integrations with Advanced Patterns
Getting data from the API is one thing, but building a truly professional-grade service is a whole different ball game. This is where you move beyond the basics and start writing smarter code, not just more code.
Mastering advanced patterns is all about efficiency, real-time responsiveness, and building an application that doesn't fall over when things go wrong. These strategies help you create powerful integrations that respect the API's resources, ensuring your app stays stable and scalable. It’s the difference between an app that just works and one that works brilliantly.
Stop Asking and Start Listening with Webhooks
One of the most inefficient things your application can do is constantly ping the API, asking, "Anything new yet? How about now?" This approach, called polling, is a surefire way to burn through your rate limit for absolutely no reason.
There's a much better way: webhooks.
Think of webhooks like subscribing to a newsletter for data. Instead of calling the Instagram API every minute to check for new comments, you just tell it, "Hey, let me know when a new comment shows up." When it does, the API instantly sends a small packet of data to a URL you've provided.
This pattern completely flips the script. Your server goes from being an annoying pest constantly knocking on Instagram's door to a patient recipient waiting for a delivery. It's the key to building real-time features like instant comment moderation or live social listening dashboards without getting rate-limited.
Setting up webhooks boils down to a few key steps:
- Configuring an Endpoint: You'll need to create a public URL on your server that can accept incoming POST requests from Instagram.
- Subscribing to Topics: Next, you tell the API exactly which events you care about—things like new comments, mentions, or story insights.
- Validating Payloads: This is a crucial security step. You must verify that the incoming data is genuinely from Meta and not some malicious actor trying to spoof a request.
Improving Performance with Batch Requests
Let's say you need to fetch the latest comment count for 20 different Instagram posts. The naive approach would be to fire off 20 separate API calls. That’s slow, clunky, and eats up a huge chunk of your rate limit.
Thankfully, the Instagram API gives us a much cleaner solution: batching.
Batching lets you bundle multiple, independent API calls into a single HTTP request. You send one request containing a list of all the operations you want to perform, and you get back one single response with all the results neatly packaged together. This massively cuts down on network latency and the number of round trips between your server and Instagram's.
For anyone looking to streamline their content strategy, learning how to automate social media posting often involves mastering these kinds of efficient API interactions to manage high volumes of content.
Building Resilient Applications with Error Handling
Newsflash: no API is perfect. Servers have bad days, networks get flaky, and unexpected errors happen. A robust application is designed to handle these failures gracefully instead of just crashing and burning.
Proper error handling isn't an afterthought; it’s a core feature of any professional integration.
Your code needs to be ready for different HTTP status codes and API error subcodes. A 400 Bad Request might mean you messed up your query, while a 403 Forbidden could signal that the user revoked your app's permissions. By logging these errors and implementing smart retry logic (with exponential backoff, so you don't hammer a struggling server), your application can recover from temporary hiccups and provide a much smoother user experience.
Clearing Up Common Instagram API Questions
Diving into the Instagram API for the first time? It's natural to have a few questions. Let's tackle some of the most common ones I hear from developers to help you sidestep potential headaches and build with a clear path forward.
One of the first things developers ask is, "Can I actually post content with this thing?" The short answer is yes, but it's not a free-for-all. The Instagram Graph API lets you publish photos, carousels, and videos directly to Instagram Business and Creator accounts. What you can't do is post Stories or Reels—that functionality is still off-limits via the API.
Costs and Account Access
Next up is the big one: money. Is the Instagram API free? Absolutely. Access to both the Graph API and the Basic Display API won't cost you a dime. Your real costs will come from building, hosting, and maintaining whatever application you create. The trick is to design your app to work smart within the free rate limits so you don't run into temporary shutdowns.
So, does that mean you can just grab data from any old Instagram account? Not a chance. The entire API is designed with privacy as a non-negotiable foundation. You can only get data from Business or Creator accounts that have explicitly given your app permission through the OAuth 2.0 flow. Even with the simpler Basic Display API, a user has to authenticate your app before you can see any of their public media.
You cannot access private account data under any circumstances without the user's direct permission. This is a fundamental privacy feature of the API and is strictly enforced.
Finally, what happens if your app gets rejected during the Meta App Review? It's a frustrating experience, but rejections almost always boil down to not following Meta's Platform Terms.
Most rejections I've seen come from a few common mistakes:
- Requesting Unnecessary Permissions: Asking for scopes your app doesn't really need is a massive red flag for reviewers. If your app just displays photos, don't ask for publishing permissions.
- A Vague Privacy Policy: You need a crystal-clear, easy-to-find privacy policy that tells users exactly what you're doing with their data. No exceptions.
- A Poor Demonstration: You have to show your work. Failing to provide a detailed screencast that walks reviewers through exactly how your app uses each and every permission you've requested is a surefire way to get denied.
Ready to skip the complexity of managing multiple social APIs? With LATE, you can integrate with Instagram, TikTok, LinkedIn, and more through one unified API. Get set up in under 15 minutes and start shipping features, not integrations. Check out the docs at LATE.

Miquel is the founder of Late, building the most reliable social media API for developers. Previously built multiple startups and scaled APIs to millions of requests.
View all articlesLearn more about Late with AI
See what AI assistants say about Late API and this topic