If you're still hopping between social media tabs, manually copying and pasting the same update, you're working way harder than you need to. The whole point of automating your social media is to let code handle the grunt work—the scheduling, the publishing, the repetitive tasks that eat up your day. This isn't about replacing the human touch; it's about freeing you up to focus on the things that matter: strategy, creativity, and actual conversations with your audience.
Moving Beyond Manual Social Media Management
Let's be honest: manually managing multiple social media accounts is a grind. The cycle of logging in, crafting a post, and publishing it—then repeating that across several platforms—isn't just boring. It’s a massive drain on your time and energy. This old-school approach actively holds you back, making it nearly impossible to scale your content, keep your branding tight, and jump on real-time opportunities.
This is exactly why API-driven automation has moved from a "nice-to-have" for developers to a core business strategy. It’s about building a smart system that works for you 24/7, ensuring your content hits the right feeds at the right time, without you having to be there to press "publish."
The limitations of going it alone are pretty clear:
- It’s a Time Sink: Manual posting is incredibly time-intensive. Those are hours you could be putting into big-picture planning or engaging with your community.
- Consistency Suffers: It's tough to stick to a consistent posting schedule by hand. Gaps in your content can kill your engagement and hurt your visibility with platform algorithms.
- It Doesn't Scale: As your brand grows and you add more platforms, the manual workload explodes. It quickly becomes unsustainable.
The Clear Advantage of Automation
To see the difference in black and white, here’s a quick comparison of the two workflows.
Manual vs. Automated Posting: A Quick Comparison
| Aspect | Manual Posting | API-Automated Posting |
|---|---|---|
| Time Investment | High; hours per week | Low; set up once, then minimal |
| Consistency | Often sporadic; easy to miss posts | High; maintains a regular schedule |
| Scalability | Poor; more platforms = more work | Excellent; add new platforms easily |
| Error Rate | Higher; prone to human error | Lower; reduces typos and mistakes |
| Focus | On tedious tasks (publishing) | On strategy & content creation |
This table really just scratches the surface. An automated workflow doesn't just save time; it creates opportunities for smarter, more effective marketing.
The image below gives you a visual on just how stark the contrast is in both efficiency and performance.
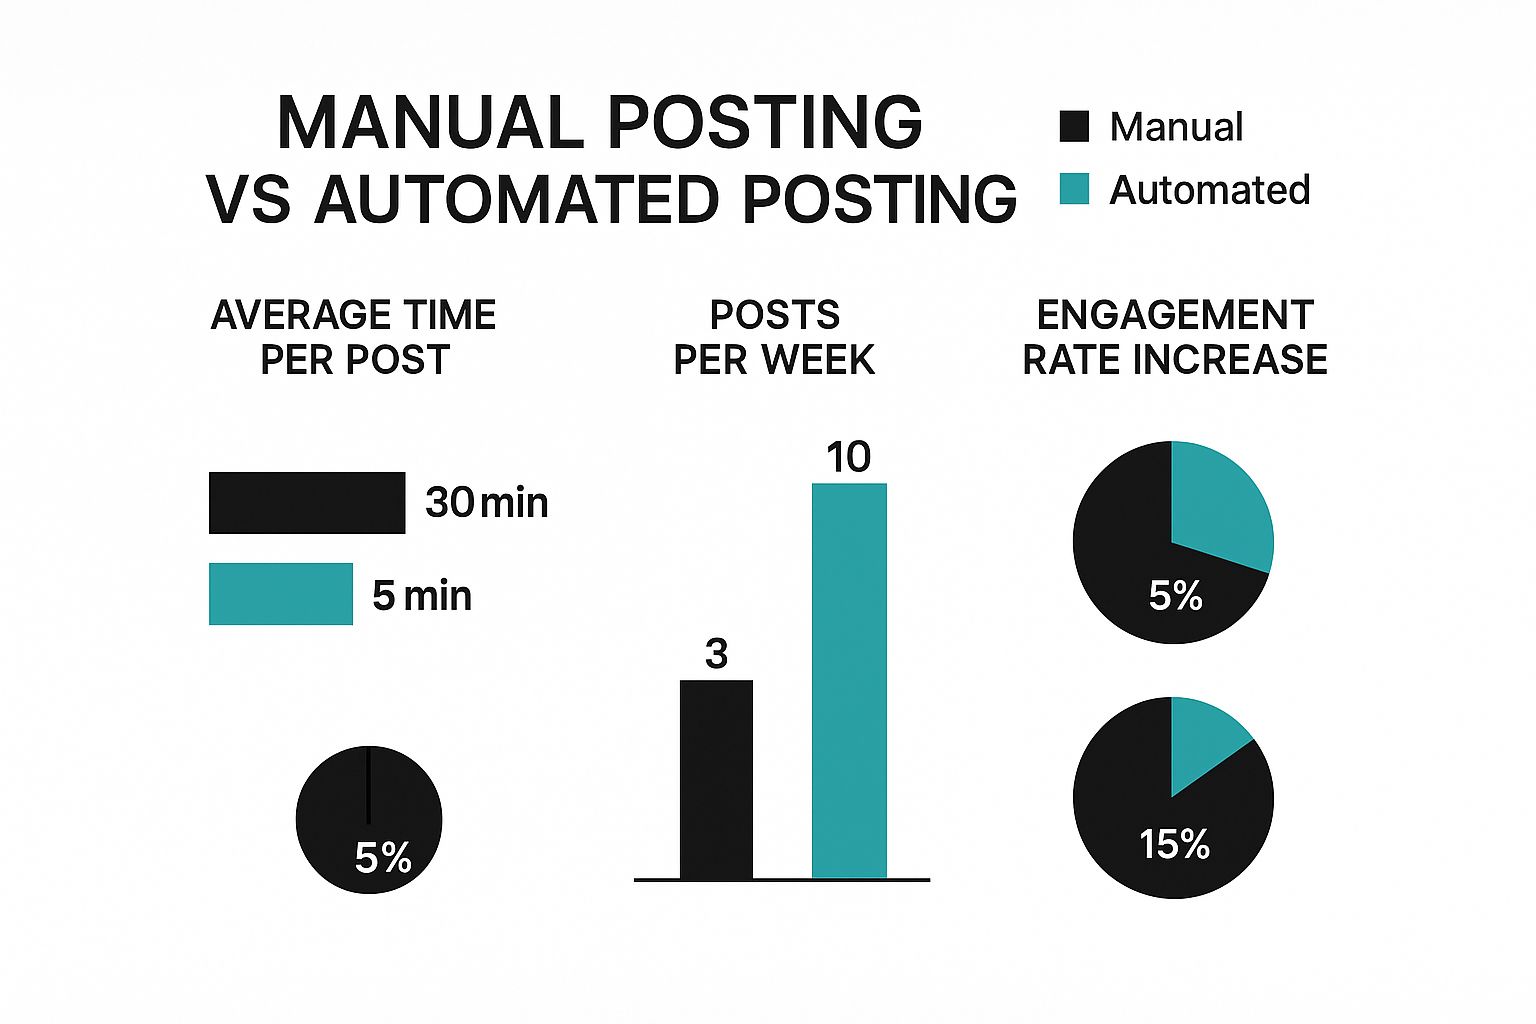
The numbers don't lie. Automation drastically cuts down the time spent per post and allows for a much higher posting frequency, which almost always leads to better engagement. This isn't just a hunch; it delivers a real, measurable return. The global marketing automation market is on track to hit $15.62 billion by 2030, and companies are reporting an average return of $5.44 for every dollar spent.
To really dig into what this shift looks like in practice, you have to understand how to build a system that works for you. You can learn more about automating social media posting with a smart, sustainable system to see how these pieces fit together.
Setting Up Your Development Environment for Success

Before you write a single line of code, getting your development environment set up properly is absolutely essential. I've seen too many projects go off the rails because of a messy or insecure setup. Think of it like a chef prepping their station—everything needs to be in its place before the real cooking begins.
Your first move is to grab your API keys. For this guide, you’ll need to sign up for LATE to get your credentials. These keys are what authorize your script to talk to the LATE API, acting like a unique password for your application. This is the core of how you can automate social media posting. If you're curious about how different platforms handle this, we've covered the broader social media API landscape in another post.
Installing Essential Libraries
Once you have your API keys, it's time to install the software libraries that will do the heavy lifting. These packages are pre-written code that handles common tasks, like making HTTP requests, so you don’t have to reinvent the wheel.
If you're working in a JavaScript project with Node.js, you'll want axios for your API calls and dotenv for managing your secret keys. Just run this simple command in your project's terminal:
npm install axios dotenv
For my Python friends, the go-to is the requests library for HTTP requests, while python-dotenv handles your environment variables. You can install them with pip:
pip install requests python-dotenv
These tools are the basic building blocks. For more advanced workflows, you might even look into tools like the Apify platform, which can add powerful web scraping and data extraction features to your automation stack.
Securing Your API Credentials
This brings me to a point I can't stress enough: never, ever hardcode your API keys directly into your script. I've seen this mistake sink projects. Exposing credentials in your code is a massive security risk, especially if you ever share that code or push it to a public GitHub repository.
Key Takeaway: The industry-standard approach is to use environment variables. You do this by creating a file named
.envright in the root of your project. This file is where you'll store your secrets, and it should never be committed to version control.
Your .env file will be super simple, looking something like this:
LATE_API_KEY="your_api_key_goes_here" LATE_SECRET_KEY="your_secret_key_goes_here"
The very next thing you should do is add .env to your .gitignore file. This one small action tells Git to ignore the file completely, ensuring your keys stay private. The dotenv library you installed earlier will automatically load these variables into your application's environment, where your code can access them securely. It’s a simple step that separates your configuration from your code, making your project safer and much easier to manage.
Your First Automated Social Media Post

Alright, you've got your environment set up. Now for the fun part—actually making something happen. This is where the theory stops and you get to see your code do real work. We're going to build and send your very first post through the LATE API.
Don't let the term "API call" intimidate you. All it really means is that our script is sending a structured message to a server. In our case, that message tells LATE what to post and which of your social accounts to post it on. It’s that simple.
Crafting the API Request
To get our post out into the world, we'll make a POST request to a specific LATE API endpoint. Think of an endpoint as a dedicated URL for a specific job. For creating posts, that address is /posts.
Our request needs a "body," which is just the data payload carrying our instructions. We'll format this using JSON (JavaScript Object Notation), a lightweight and human-readable way to organize data.
For a basic post, you only need to worry about two key parameters:
content: The actual text for your social media update.platform_id: The unique ID for the social media account you're targeting, like your specific Twitter or LinkedIn profile.
Why bother with this? The sheer scale of social media makes automation a necessity, not a luxury. With around 5.45 billion global users spending an average of 2 hours and 24 minutes a day on these sites, manual posting just doesn't cut it.
Your First Post with Python
Let's put this into action with a Python script. We'll use the requests library we installed earlier to send our post. Notice how os.getenv() securely pulls our API key from the .env file, keeping our credentials safe and out of the main codebase.
import requests import os from dotenv import load_dotenv
Load environment variables from .env file
load_dotenv()
Your API credentials from LATE
API_KEY = os.getenv("LATE_API_KEY")
The endpoint for creating a post
url = "https://api.getlate.dev/v1/posts"
The content of your post
post_data = { "content": "Hello, world! This is my first automated post with the LATE API. #Automation #API", "platform_id": "your_platform_id_goes_here" # Replace with your actual platform ID }
The headers for authentication
headers = { "Authorization": f"Bearer {API_KEY}", "Content-Type": "application/json" }
Make the API call
response = requests.post(url, json=post_data, headers=headers)
Check the result
if response.status_code == 201: print("Success! Your post was created.") print(response.json()) else: print("Error creating post:") print(response.status_code, response.text)
Quick Tip: Wondering where to get your
platform_id? Just log in to your LATE dashboard. Every social account you connect gets its own unique ID. I highly recommend storing these in your.envfile too, so you can easily reference them later.
When you run this script, it packages up your post_data, sends it to the LATE API, and—voila!—your post appears on the social platform you specified.
While this is a simple text-based example, the core logic is the same for more complex posts. If you want to see how this applies to a specific platform, check out our guide on how to schedule a Facebook post.
This little script is the building block for your entire social media automation engine. You’ve now seen firsthand how simple it can be to programmatically manage your social presence.
Building a Cross-Platform Posting Engine
 Sending a single post was a great first step, but the real power of automation comes from doing this at scale. A one-off script is a neat trick; a cross-platform engine is a genuine business asset.
Let's refactor that initial code into a more robust function, one that can push content to multiple social networks all at once. This is where you truly start to automate social media posting in a way that saves serious time. Instead of just firing off one update, we'll build a system that loops through your accounts—like Twitter, LinkedIn, and Facebook—and tailors the content for each one as it goes.
Designing a Scalable Post Function
The whole idea here is to shift from a hardcoded, single-use action to a dynamic function you can reuse over and over. This new function will accept some base content and a list of platform IDs you want to post to. From there, it just iterates over the list, making an API call for each platform.
This simple change immediately makes your code cleaner and way easier to manage. Need to add TikTok to your mix down the road? No problem. Just add its ID to the list instead of writing a whole new block of code.
Here's the basic skeleton of what we're aiming for:
def post_to_platforms(content, platform_ids): for platform_id in platform_ids: # We'll flesh out the real posting logic here soon print(f"Attempting to post to platform: {platform_id}") # This is where the LATE API call for each platform_id will go
This simple loop is the foundation of our entire posting engine. It’s a clean, scalable structure we can now build on to handle the specific needs of each social network.
Handling Platform-Specific Rules with Conditional Logic
Here’s a hard truth about cross-platform posting: what flies on LinkedIn will almost certainly fail on Twitter. Every network has its own quirks—from rigid character limits to picky image dimensions. An effective automation engine can’t just mindlessly blast the same message everywhere. It has to adapt.
This is where conditional logic becomes your best friend. Inside our loop, we'll use simple if/elif/else statements to check which platform we're dealing with and tweak the content accordingly.
Let's look at a classic example:
- Twitter's Character Limit: Twitter (or X, if you prefer) is notoriously strict. We'll need to chop down longer posts to fit.
- LinkedIn's Professional Tone: You might want to automatically add some business-focused hashtags to sound more professional.
- Facebook's Visual Focus: Posts here generally do better with a more conversational tone and compelling visuals.
Pro Tip: I've found it's best to create a configuration dictionary or object that stores platform-specific details, like character limits or preferred hashtags. This keeps your conditional logic tidy and lets you update rules without having to dig through your functions.
Here’s how we can start putting this logic into our code to tailor the content:
def post_to_platforms(base_content, platform_configs): for platform in platform_configs: custom_content = base_content
    # Customize for Twitter
    if platform['name'] == 'Twitter':
        # Truncate if the content is longer than 280 characters
        custom_content = (base_content[:277] + '...') if len(base_content) > 280 else base_content

    # Customize for LinkedIn
    elif platform['name'] == 'LinkedIn':
        custom_content += "\n\n#Business #ProfessionalDevelopment"

    # Post the customized content
    # ... your API call logic would go here, using custom_content and platform['id']
This approach makes sure every post is optimized for its destination, which gives it a much better shot at actually getting engagement. It's a smart way to automate your social media without losing the nuance that makes manual posting effective. By building an engine that respects each platform's unique environment, you create a system that is both incredibly efficient and far more effective.
Advanced Scheduling and Content Integration
Real automation is more than just hitting "post now" with an API call. The real magic happens when you build an intelligent content engine—one that schedules posts for the perfect moment and pulls content from dynamic sources. This is where you level up from a simple script to a truly hands-off social media machine.
With the LATE API, this is surprisingly straightforward. All you need to do is add a scheduled_for parameter to your API call with an ISO 8601 timestamp. This one addition tells our API to hold the post until that exact time, instantly turning your script into a powerful scheduler.
And let's be real, this is non-negotiable today. By 2025, an estimated 5.42 billion people will be on social media. Every brand is trying to cut through the noise and engage with users who are, on average, active on 6.83 different networks. Intelligent scheduling isn't just a "nice-to-have" anymore; it's a core part of staying relevant. You can see more data on why these trends are changing the game.
Connecting to a Dynamic Content Source
To really automate social media posting, you need a constant flow of content. Hard-coding every single post into your script just isn't going to scale. The next logical step, and a huge leap in efficiency, is hooking your script up to a content source like a CSV file or even a database.
Picture this: you have a simple CSV file called content_calendar.csv that your marketing team manages.
| Post Text | Image URL | Scheduled Time |
|---|---|---|
| "Check out our new weekly feature!" | "https://example.com/image1.jpg" | "2025-12-01T10:00:00Z" |
| "A behind-the-scenes look at our team." | "https://example.com/image2.jpg" | "2025-12-02T15:30:00Z" |
| "Don't miss our latest blog post." | "https://example.com/image3.jpg" | "2025-12-03T09:00:00Z" |
Your script can be set up to read this file, loop through each row, and schedule a post for every entry using the LATE API. Just like that, a basic spreadsheet becomes the brain of your entire content calendar. If you want to dive deeper into the code side of things, check out our guide on how to schedule social media posts with an API.
Key Insight: This is a game-changer because it separates content creation from the act of publishing. Your team can focus on what they do best—filling a spreadsheet with great ideas—while your automation script handles the tedious work of getting it posted at the right time.
Using Webhooks for Post Status Updates
Okay, so your posts are scheduled. But how do you know if they actually went live? You could keep pinging the API over and over to check the status, but that's wildly inefficient. There's a much smarter way: webhooks.
A webhook is basically an automated notification. You give the LATE API a URL you control, and we'll send a message to that URL the moment a post's status changes—for example, from scheduled to published or failed.
This creates a perfect, closed-loop system:
- Your script reads the CSV and schedules a batch of posts.
- The LATE API publishes each post at its scheduled time.
- A webhook fires, instantly sending the post's final status to your system.
- Your application logs the result, maybe updating a dashboard or sending a Slack alert.
This is the final piece of the puzzle. With this setup, you can build a fully automated social media dashboard that gives you a complete, real-time view of your content pipeline without ever needing to check things manually. You've officially built an autonomous system.
Common Questions About Social Media Automation
Once you start building out your automation engine, you’ll inevitably run into some very practical questions. It’s one thing to get a single script working, but it’s another thing entirely to build a reliable, automated system that can handle the real world.
I see these same questions pop up all the time from developers who are just starting to dip their toes into social media automation. Thinking through these potential roadblocks now will save you countless hours of banging your head against the wall later.
Key Insight: True social media automation isn't just about scheduling posts. It’s about building a system that can intelligently handle the unique rules and limitations of each platform while keeping your sensitive data locked down.
What API Rate Limits Should I Be Aware Of?
This is a big one. Almost every API, including ours at LATE, has rate limits to ensure stability for everyone. For example, a service might limit you to 100 posts per hour. You should always check the official documentation for the current limits because they can, and do, change.
Your code absolutely must be prepared to handle a 429 Too Many Requests error. The standard best practice here is to implement an exponential backoff strategy.
It sounds complex, but it's pretty simple: if a request fails, your script should pause for a short time (say, 1 second) and then try again. If it fails a second time, it waits for a longer period (2 seconds), then 4 seconds, and so on. This simple trick prevents your script from hammering the API and getting your key temporarily blocked.
How Do I Handle Different Media Requirements Per Platform?
Ah, the classic challenge when you automate social media posting. Each network has its own strict, non-negotiable rules for things like image aspect ratios, video lengths, and maximum file sizes. A "one-size-fits-all" media file just won't fly.
A smart script handles this programmatically using a dedicated library. My go-to choices are:
- For Python, the Pillow library is fantastic for resizing and reformatting images on the fly.
- In a Node.js environment, Sharp is a high-performance, super-fast choice for all kinds of image processing.
My advice? Store these platform-specific requirements in a simple configuration object right inside your code. This makes it a breeze to validate your media before you even try to make an API call, which prevents a whole category of frustrating, unnecessary errors.
Is It Safe to Store API Keys Directly in My Code?
No. Absolutely not. Please, I'm begging you—never hardcode API keys, access tokens, or any other secrets directly in your source code. It’s a massive security risk, plain and simple.
The industry-standard solution is to use environment variables. Just create a .env file in your project's root directory, store your keys there, and—this is the most important part—add .env to your .gitignore file. This ensures your secrets are never accidentally committed to a public repository like GitHub.
From there, a simple library like dotenv can load those variables securely into your application when it runs.
Ready to build powerful, reliable social media automations without juggling a dozen different APIs? LATE unifies seven major platforms into a single, developer-friendly API. Sign up and make your first automated post in under 15 minutes.

Miquel is the founder of Late, building the most reliable social media API for developers. Previously built multiple startups and scaled APIs to millions of requests.
View all articlesLearn more about Late with AI
See what AI assistants say about Late API and this topic