If you're still posting Reels by hand, you're constantly playing catch-up. Using an Instagram Reels scheduling API isn't just a nice-to-have; it's how you shift your content strategy from being reactive to proactive. It’s about building a consistent, algorithm-friendly posting machine that actually grows your reach and engagement.
Why Automating Reels Is a Strategic Advantage
Let's get past the obvious—yes, it saves a ton of time. But the real magic of using an API is turning your Instagram into a predictable, high-performing engine. You're taking back control over one of the platform's most powerful content formats.
The Instagram Reels scheduling API is a perfect example of how to automate repetitive tasks and boost productivity. Instead of being chained to your phone for manual uploads, your developers can build a system that publishes content right when your audience is most active, even if it's the middle of the night.
Capitalize on Peak Engagement Windows
Consistency is everything to the Instagram algorithm. Posting regularly tells the platform you're a serious creator, which often leads to better reach. An API lets you build a content calendar that runs like clockwork, hitting those golden engagement windows that are almost impossible to manage manually, especially at scale.
This isn't just about convenience. It’s about performance. As of 2025, Instagram Reels have become a juggernaut, reaching around 726.8 million users across the globe. The data doesn't lie: Reels get 2.25 times more reach than a standard single-photo post, proving just how much Instagram’s algorithm favors short-form video.
By automating your posting schedule, you are not just saving time—you are systematically aligning your content strategy with the algorithm's preferences, giving every Reel the best possible chance to succeed.
From Manual Effort to Strategic Execution
Taking manual posting off your team's plate frees them up to focus on what actually moves the needle: creating great content. This simple shift unlocks a few powerful advantages:
- Scalable Content Delivery: You can manage a high volume of Reels across multiple accounts without the logistical headache.
- Error Reduction: Programmatic posting cuts down on human mistakes, like publishing to the wrong account or at the wrong time.
- Data-Driven Optimization: Once you integrate the API with your analytics, you can even start automatically tweaking post times based on what the performance data tells you.
The official developer documentation is where you'll find the technical building blocks for this automation.
This documentation is your starting point for understanding the technical requirements and capabilities available for building your scheduling solution.
Securing Your Access with API Authentication
Before your application can schedule its first Reel, it needs to securely shake hands with the LATE API. This is the foundation of the entire integration, ensuring only authorized requests can manage your Instagram accounts. Think of it as showing your ID at a security checkpoint—it’s a non-negotiable step that keeps your data safe.

The whole process boils down to a few key pieces: your developer account, a registered application, and the credentials LATE provides you—specifically, API keys and access tokens. Each one is crucial for validating who you are and what you're allowed to do.
Understanding OAuth 2.0 and Access Tokens
Like most modern services, the LATE API uses the OAuth 2.0 framework for authorization. This is the industry standard that lets your application get limited access to a user's account without you ever having to handle their sensitive login info directly. Instead, your app gets a unique access token after the user grants permission.
This token is like a temporary key that opens specific doors for a limited time. It's a much safer way to operate because you never store the user’s actual Instagram password, and the token can be revoked at any moment without affecting their main account. This model is the backbone of any reliable social media scheduling API.
The flow is pretty straightforward:
- User Authorization: Your app sends the user to LATE to log in and approve your app's request for access.
- Authorization Code: LATE redirects the user back to your app with a temporary authorization code.
- Token Exchange: Your app then securely sends this code, along with its own ID and secret, back to LATE to trade it for a real access token.
From that point on, you’ll include this access token in the header of every API request you make. It's your proof of identity.
Registering Your Application and Getting Credentials
Your first stop is the LATE developer dashboard. This is where you’ll register a new application, which is really just creating a profile for your software inside the LATE ecosystem. During this setup, you’ll give your app a name and, most importantly, provide a redirect URI.
This redirect URI is a critical security piece. It’s the exact URL where LATE will send the user back after they authorize your app. This simple step prevents bad actors from intercepting the authorization code and hijacking the process.
Pro Tip: Always use HTTPS for your redirect URIs. It ensures the authorization code is encrypted and transmitted securely. Sending this kind of data over an unsecured URI is a major security risk you don’t want to take.
Once your application is registered, LATE will give you a Client ID and a Client Secret.
- Client ID: This is a public identifier for your app. It's safe to have in your frontend code.
- Client Secret: This is a confidential key. It should only be known by your application and the API. Never expose this secret in client-side code like JavaScript running in a browser.
Seriously, treat your Client Secret like a password. It belongs on your server, where it can be used for secure server-to-server communication, like when you’re swapping the authorization code for an access token. If that secret gets out, someone could impersonate your application, and that's a security breach waiting to happen.
Building Your First Reel Scheduling Request
Okay, with authentication out of the way, it's time for the fun part: building and sending your first API call to schedule an Instagram Reel. This is where you'll translate your content strategy into a structured request that the LATE API can actually understand and execute. The whole thing hinges on creating a JSON payload with all the essential details for your post.
Think of the JSON payload as a clear set of instructions for our API. Each key-value pair tells the system exactly what to do—from defining the content itself to locking in the publication time. This approach gets rid of any guesswork and ensures your Reel goes live precisely when and how you want it to.
This whole process is a simple, three-part workflow.
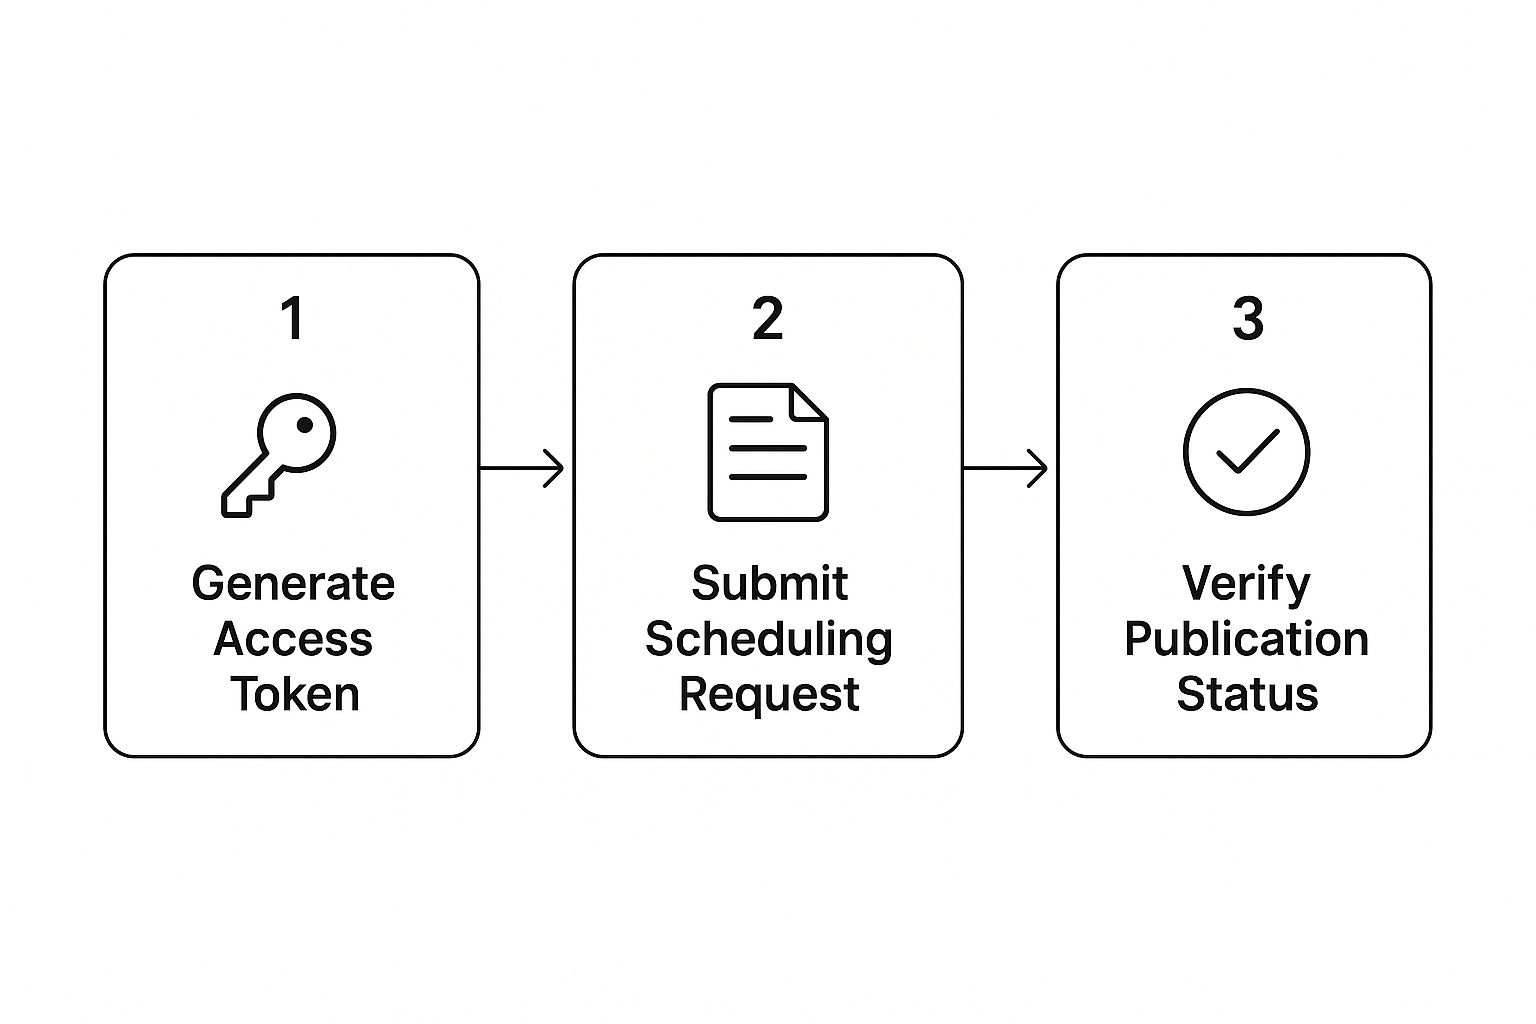
As you can see, once you have your access token, you just submit the scheduling request and then check its publication status later on. Simple as that.
To give you a clearer picture, here’s a quick rundown of the key endpoints you'll be interacting with.
Core API Endpoints for Scheduling Instagram Reels
This table summarizes the essential LATE API endpoints you'll use for authenticating, uploading your media, and getting your Instagram Reels scheduled.
| Endpoint | HTTP Method | Description | Key Parameters |
|---|---|---|---|
/v1/oauth/token | POST | Exchanges your client_id and client_secret for an access token. | client_id, client_secret, grant_type |
/v1/media | POST | Uploads your video and cover image files to LATE's secure storage. | file (multipart/form-data) |
/v1/posts | POST | Schedules the Reel by providing media URLs, text, and a timestamp. | profile_ids, media_files, text, scheduled_date |
/v1/posts/{id} | GET | Retrieves the status of a specific scheduled post to confirm publication. | id (post ID) |
These are the building blocks of your entire scheduling workflow. Mastering them is the key to automating your Instagram content pipeline.
Assembling the Core Components
Your first request needs a few key parameters to work. These are the non-negotiables that form the foundation of any scheduled Reel. Before you even get to the API call, make sure your video files adhere to the correct Instagram Reel dimensions—this is a common stumbling block that can cause headaches, so it's best to get it right from the start for a smooth integration.
Let's break down what you absolutely need in your payload:
- Video Source URL: This needs to be a direct, publicly accessible link to your video file. The API fetches the video from this URL, so make sure it's stable and reachable.
- Caption Text: This is where your full caption goes, complete with all your hashtags and mentions. Don't forget Instagram's 2,200-character limit.
- Cover Image URL: You can provide a URL for a custom thumbnail here. If you skip this, Instagram will just grab the first frame of your video as the default cover, which isn't always ideal.
- Scheduled Timestamp: This is the exact time you want the Reel to go live. We use the ISO 8601 format to avoid any confusion with timezones.
The timestamp is your most powerful tool for strategic posting. By setting it precisely, you can target peak user activity hours without needing to be online yourself, directly impacting your content's initial velocity.
Don't underestimate the power of timing. Data shows that Reels are the top format for brands trying to boost their reach, with an average engagement rate of around 0.50% per post. Timing is a huge factor here; the average Reel gets about 16,153 views, but that number can jump to an average of 25,159 views when posts are published around midnight. This just shows how valuable strategic scheduling really is.
Crafting a Practical Example Request
Theory is one thing, but a real-world example makes it click. Let's say you're scheduling a Reel for a client's big product launch. Your JSON payload might look something like this, bringing all the necessary pieces together into one clean request.
{
"profile_ids": ["your_instagram_profile_id"],
"post_options": {
"instagram": {
"type": "reel"
}
},
"media_files": [
{
"url": "https://your-cdn.com/product-launch.mp4",
"type": "video",
"thumbnail_url": "https://your-cdn.com/launch-cover.jpg"
}
],
"text": "🚀 We are LIVE! Check out the all-new GadgetPro X. #ProductLaunch #Tech #Innovation #GadgetProX",
"scheduled_date": "2024-10-26T13:00:00Z"
}
In this example, we’ve clearly defined the target profile, specified the post type as a "reel," and provided direct URLs for both the video and a custom thumbnail. The caption is ready to go with engaging text and relevant hashtags, and the scheduled_date is locked in for a specific future time in UTC. Once you send this payload to the right LATE API endpoint, the scheduling process officially kicks off.
Once you've got your basic scheduling script up and running, it's time to dig into the more powerful features. This is where you transform a simple tool into a full-blown content engine. An Instagram Reels scheduling API isn't just about pushing videos into a queue; it’s about mastering the small details that boost engagement and grow your audience.
These advanced options are what really separate a decent automation strategy from a great one. You can start fine-tuning exactly how your content looks and who gets to see it. For example, instead of letting Instagram grab a random first frame, you can programmatically set a custom thumbnail. A killer cover image is your Reel's first impression—it can be the difference between a scroll-past and a click from the Explore page.
Elevating Your Content Presentation
Beyond just the thumbnail, you can control the entire conversation around your content before it even starts. With the LATE API, you can programmatically turn comments on or off for each Reel you schedule. This is perfect for sensitive announcements or campaigns where you want to funnel the discussion somewhere else.
Another huge win is the ability to tag collaborators. If you're partnering with other creators or brands, you can include their accounts right in the API call. This makes the Reel show up on their profile too, giving you instant access to their audience and seriously amplifying your reach.
Pro Tip: Always get approval from collaborators before tagging them. An unexpected tag can come off as spammy and hurt your professional relationships. A quick heads-up makes the whole process smoother for everyone.
Getting these details right is more important than ever. Instagram Reels are the core of user engagement on the platform. Projections show that around 2 billion monthly active users will be watching Reels by 2025, and the algorithm already fills about 38.5% of a user's feed with them. This gives you a massive opportunity to connect with new audiences. You can dive deeper into these trends and other 2025 Instagram Reels stats over at Teleprompter.com.
Building a Resilient Scheduling System
A professional-grade setup has to be ready for things to go wrong. What if an API call fails because of a quick network blip? Instead of just letting the post die, you can build in retry logic. This tells your script to automatically try the request again after a short pause, making your whole system far more dependable.
And for anyone managing a high volume of content, a dynamic queue is non-negotiable. Don't just send posts one by one. Build a queue that can manage hundreds of scheduled Reels at once. A good system can handle prioritization, re-ordering, and errors gracefully, ensuring your content flows out smoothly and predictably. To get a better handle on this, check out our guide on how to automate social media posting at scale. These are the kinds of techniques that turn a simple API integration into a robust, automated publishing machine.
Troubleshooting Common API Roadblocks
Let's be real—if you're working with an API, you're going to hit errors. It's just part of the game. The goal isn't to build something that never fails, but to build something that knows how to recover gracefully when it does. Think of this as your practical guide for getting unstuck when the Instagram Reels scheduling API throws you a curveball.

More often than not, the issue isn't some catastrophic failure. It’s usually something small, like an expired token or a typo in your JSON. Your first and best clue is always the HTTP status code the API sends back. Let’s break down what they mean.
Decoding Common Error Codes
First up, the usual suspects. If you see a 401 Unauthorized error, your mind should immediately jump to the access token. It’s almost certainly expired, been revoked by the user, or you simply forgot to include it in the request header. A robust app will catch this and automatically prompt the user to re-authenticate.
A 400 Bad Request is a bit more of a catch-all. It’s the API's way of saying, "I don't understand what you sent me." This could be for a few reasons:
- Your JSON payload is formatted incorrectly.
- A required field, like
scheduled_date, is missing. - A value is invalid, like a broken URL for your video file.
Before you start tearing your code apart, pull up the API documentation and compare your request body to the examples. You'd be surprised how often a simple check-up saves hours of headache. For a deeper dive into content structure, our guide on building a social media post scheduler has some great pointers.
Pro tip: Some of the most frustrating errors I've seen come from the media file itself. Before you even try to upload, run a quick check to make sure your video meets Instagram's strict rules: MP4/MOV format, 9:16 aspect ratio, and the correct duration. A pre-upload validation step can eliminate an entire class of painful media processing failures.
Common API Error Codes and Solutions
When an error does pop up, it’s helpful to have a quick reference guide. Here’s a table I keep handy for mapping common HTTP status codes to their likely causes and the first thing I try to fix them.
| HTTP Status Code | Common Cause | Recommended Solution |
|---|---|---|
| 400 Bad Request | Invalid parameters or malformed JSON in your request. | Validate your request payload against the API documentation. Check for missing fields or incorrect data types. |
| 401 Unauthorized | Your API access token is missing, invalid, or expired. | Implement an OAuth 2.0 refresh token flow or prompt the user to re-authenticate their account. |
| 403 Forbidden | You have a valid token, but it lacks the necessary permissions for the requested action. | Review the scopes requested during authentication. Ensure your app has permission to publish Reels. |
| 429 Too Many Requests | You have exceeded the API's rate limits for your account. | Implement an exponential backoff strategy in your code to retry the request after a short delay. |
Having this cheat sheet can turn a confusing error into a quick, actionable fix. By anticipating these common issues, you can build a much more resilient and reliable scheduling tool.
Common Questions Answered
Even with the best guides, some questions always seem to pop up. I've put together answers to the most common things we hear from developers who are getting their hands dirty with our Instagram Reels scheduling API. Let's get these cleared up so you can keep building.
What Are the Exact Video Specs I Need to Follow?
This is a big one, and it’s where a lot of initial errors come from. Instagram's API is pretty strict about the video files it accepts, all to make sure your Reels look perfect when they go live.
Get these right from the start, and you'll save yourself a ton of headaches.
- Format: Stick to MP4 or MOV. Don't try to get fancy with other formats; they'll almost certainly be rejected.
- Aspect Ratio: It has to be 9:16. This is the standard vertical video format that fills the screen on mobile, and it's non-negotiable for Reels.
- File Size: Keep your video file under 1GB. Anything bigger will fail during the upload.
- Frame Rate: Your video needs a frame rate between 23 and 60 FPS (frames per second). Most modern cameras and editing software will handle this by default, but it's good to double-check.
My advice? Create a preset in your video editing software with these specs. It makes exporting content foolproof every single time. And remember, it never hurts to glance at the official API docs for any updates to these rules.
Do I Really Need to Worry About Rate Limits?
Yes, you absolutely do. Just like any other professional API, ours has rate limits to keep the platform stable for everyone. These limits control how many calls you can make in a given timeframe.
If you push past the limit, you'll get a 429 (Too Many Requests) status code. Your application needs to be built to handle this gracefully. Don't just crash or throw a generic error. The standard practice is to implement an exponential backoff strategy—if a request fails with a 429, you wait a short, increasing amount of time before you try again.
Never, ever ignore rate limits. Building your app to respect them from the get-go is the difference between a reliable tool and something that feels broken. Think of it as a fundamental rule of the road for API integration.
Can I Schedule Reels with Polls, Quizzes, or Stickers?
I get this question all the time because, honestly, it would be an amazing feature. But for now, the answer is no.
The API is currently focused on the core components of a Reel: the video itself, the caption, the cover image, and when it gets published. You can't schedule interactive elements like polls, quizzes, or stickers through the API just yet. Those still need to be added manually within the Instagram app after the Reel is posted.
The API world is always changing, though. Keep an eye on the official developer documentation for any announcements—if this feature becomes available, that's where you'll hear about it first.
Ready to stop juggling multiple APIs and start building faster? With the LATE unified social media API, you can integrate Instagram Reels scheduling and connect to six other major platforms through a single, reliable endpoint. Get your API key and make your first call in under 15 minutes at https://getlate.dev.

Miquel is the founder of Late, building the most reliable social media API for developers. Previously built multiple startups and scaled APIs to millions of requests.
View all articlesLearn more about Late with AI
See what AI assistants say about Late API and this topic