So, what exactly is a twitter post scheduler? In simple terms, it's a tool that automates your posting, letting you line up tweets to go live at a specific date and time. This means you can maintain a consistent presence without having to manually post everything in real time.
It’s an absolute game-changer for reaching different time zones, hitting those peak engagement hours, and actually sticking to a content calendar. And for developers, building one yourself gives you ultimate control over the entire process.
Why Build Your Own Twitter Post Scheduler

Let’s be honest, manually posting on Twitter (now X) is a grind. To stay relevant, you have to show up consistently, right when your audience is scrolling. While there are plenty of off-the-shelf tools out there, building your own twitter post scheduler with a unified API like LATE is more than just a coding exercise—it’s a massive strategic advantage.
When you build your own solution, you unlock capabilities that pre-packaged platforms just can’t offer.
- Total Customization: You get to define all the rules. Want to set up intricate content queues based on categories? Or how about automatically recycling your greatest hits? A custom build lets you do that.
- Seamless Integration: Your scheduler can plug directly into your other systems. Imagine automatically tweeting about a new blog post the second it goes live on your CMS, or announcing a new feature from your product database.
- Data Ownership: You’re in full control of all your data. From the content itself to the performance analytics, it’s all yours, without being stuck inside a third-party dashboard with its own limitations.
Gaining A Competitive Edge With Automation
Building your own scheduler isn’t just about convenience; it gives you a serious competitive edge. With a staggering 611 million active users globally, the Twitter algorithm gives a huge boost to posts that get engagement right away. By scheduling your tweets for those prime engagement windows—usually between 9 AM and 2 PM on weekdays—you dramatically increase your content's initial reach. That kind of precision is what turns a good strategy into a great one.
A custom scheduler shifts your Twitter strategy from reactive to proactive. You're no longer scrambling to find something to post each day. Instead, you're building a thoughtful, long-term content pipeline that runs on its own, freeing you up to focus on what really matters—like engaging with your community.
Learning how to create effective automated social media posts is the perfect place to start. And if you want to zoom out and look at the bigger picture, our general guide on https://getlate.dev/blog/how-to-schedule-social-media-posts provides some great context.
Ultimately, building this tool means you own your entire social media workflow, ensuring your brand shows up consistently and powerfully online.
Manual Posting vs Custom Scheduler
To really drive the point home, here’s a quick look at how manual tweeting stacks up against a custom, API-driven solution.
| Feature | Manual Posting | Custom Scheduler (with LATE API) |
|---|---|---|
| Consistency | Inconsistent; relies on daily manual effort. | Fully automated; maintains a perfect posting rhythm. |
| Timing | Limited to your own active hours. | Precisely targets peak engagement windows across all time zones. |
| Scalability | Difficult to manage as content volume grows. | Effortlessly handles hundreds or thousands of scheduled posts. |
| Integration | Isolated; requires copy-pasting from other tools. | Directly connects to CMS, databases, and other internal systems. |
| Content Strategy | Reactive and often last-minute. | Proactive; allows for long-term planning and content queues. |
| Efficiency | High manual effort, time-consuming. | Runs on autopilot, freeing up valuable time for strategic tasks. |
As you can see, the shift from manual effort to a custom scheduler isn't just an upgrade—it's a fundamental change in how you approach your social media strategy.
Preparing Your Development Environment

Alright, before we dive into the code for our Twitter post scheduler, we need to get our house in order. A little prep work now saves a ton of headaches later and lets us focus on the fun part—building the actual scheduler. Think of this as laying the foundation.
First things first, you'll need access to the LATE API. Just head over to their developer portal and sign up. It’s a pretty standard process, and once you're in, you'll land on a dashboard where you can create a new application.
After registering your app, LATE will give you a set of API keys. These are usually a Client ID and a Client Secret, and they're what your application will use to prove it has permission to talk to the API. Guard these carefully—they're as sensitive as any password.
Core Software Requirements
With your API credentials secured, it's time to prep your local machine. We're going to build this project with Node.js, a fantastic JavaScript runtime that's practically made for building server-side apps like this one.
- Node.js: If you don't have it installed, grab the latest Long-Term Support (LTS) version from the official website. It's the most stable choice.
- npm (Node Package Manager): This handy tool comes bundled with Node.js, so you don't need a separate install. We'll use it to pull in all the project dependencies we need.
To make sure everything's working, pop open your terminal or command prompt and run node -v and then npm -v. If you see version numbers pop up for both, you're all set.
Security First: Managing Your API Keys
Whatever you do, never hardcode API keys directly into your code. It's a massive security risk. If that code ever ends up on a public GitHub repo, your keys are out in the wild for anyone to find and abuse.
The right way to handle this is with environment variables. In the root of your project, create a new file named .env. This file will hold all your secret info, safely tucked away from your main codebase. You'll also want to add .env to your .gitignore file to ensure it never gets committed to version control.
Inside your .env file, you’ll store your keys like this:
YOUR_API_KEY=your_client_id_here
YOUR_API_KEY=your_client_secret_here
This simple step keeps your credentials secure and makes your app more flexible. You can easily switch configurations between development and production without ever touching the code itself. Taking a few minutes for these setup steps now paves the way for a much smoother and safer build process.
Getting Connected to the LATE API
Alright, you’ve got your environment set up and your API keys are ready to go. Now for the exciting part: connecting your app to the LATE API. This is where your Twitter post scheduler stops being a local project and starts talking to the outside world. Think of authentication as the digital handshake that proves your app is legit.
The whole process boils down to sending your credentials with every single request you make. LATE, like most modern APIs, handles this with an authorization header. We'll use Node.js and a super popular HTTP client library called Axios to keep our code clean and simple.
Making Your First API Call
First things first, let's get Axios into your project. Pop open your terminal in the project directory and run npm install axios. This command adds the library to your project, giving you a powerful and straightforward way to make HTTP requests.
With Axios installed, we can build our first request. A good starting point is always a simple "read" operation that won't change anything, just to confirm the connection works. Fetching your user profile is perfect for this—it’s a low-stakes way to see if your keys are valid.
Here’s a quick code snippet showing how to set up the authorization header and make the call:
const axios = require('axios');
// Your API keys should be loaded from environment variables
const clientId = process.env.YOUR_API_KEY;
const clientSecret = process.env.YOUR_API_KEY;
async function testAuthentication() {
try {
const response = await axios.get('https://api.getlate.dev/v1/user/profile', {
headers: {
'Authorization': Bearer ${clientSecret},
'X-Client-Id': clientId
}
});
console.log('Authentication successful! User Profile:', response.data);
return response.data;
} catch (error) {
console.error('Authentication failed:', error.response ? error.response.data : error.message);
}
}
testAuthentication();
In this code, we've created a simple async function to manage the API call. The headers object is what matters most here. It includes the Authorization header with your secret key (as a Bearer token) and the custom X-Client-Id header. If you get a successful response, you're officially connected.
What to Do When Authentication Fails
Don't sweat it if you hit a snag here; it happens to everyone. The good news is that API error messages are usually pretty clear about what went wrong. While you're on the consumer side of things, getting a glimpse into the process of building an API in Django can actually give you a much better feel for how these interactions work under the hood.
Here are a few of the usual suspects when an authentication request fails:
- Invalid Credentials (401 Unauthorized): This is the classic. Double-check your
.envfile. Make sure you copied theYOUR_API_KEYandYOUR_API_KEYexactly, with no extra spaces or typos. - Incorrect Scopes: Your API key might not have permission to do what you're asking. Hop over to your LATE developer dashboard and confirm the key is authorized for posting and reading profile info.
- Malformed Header: The format has to be perfect. Make sure your
Authorizationheader looks exactly likeBearer your_client_secret_here. Even a missing space will cause the request to fail.
Getting that first successful authentication is a huge milestone. It’s the proof-of-concept you need, confirming your entire setup is correct and unlocking the real power of the API. From here, you can start building the core scheduling logic. For a deeper look at the platform's capabilities, check out our guide on how to schedule posts on Twitter.
By patiently testing your connection and knowing what to look for, you'll have a rock-solid foundation for the rest of your scheduler.
Crafting Your Core Scheduling Logic
Now that we’ve confirmed our connection to the LATE API, it's time to build the real engine of our Twitter post scheduler. This is where we go from just pinging the API to architecting a system that can actually queue up, manage, and fire off content automatically. The goal here is a reliable workflow: you give it a tweet and a future timestamp, and it handles the rest. No babysitting required.
At its core, any scheduler boils down to two things: a place to store your scheduled posts and a process that constantly checks that storage to publish whatever is due.
This simple workflow is exactly what we're about to automate.
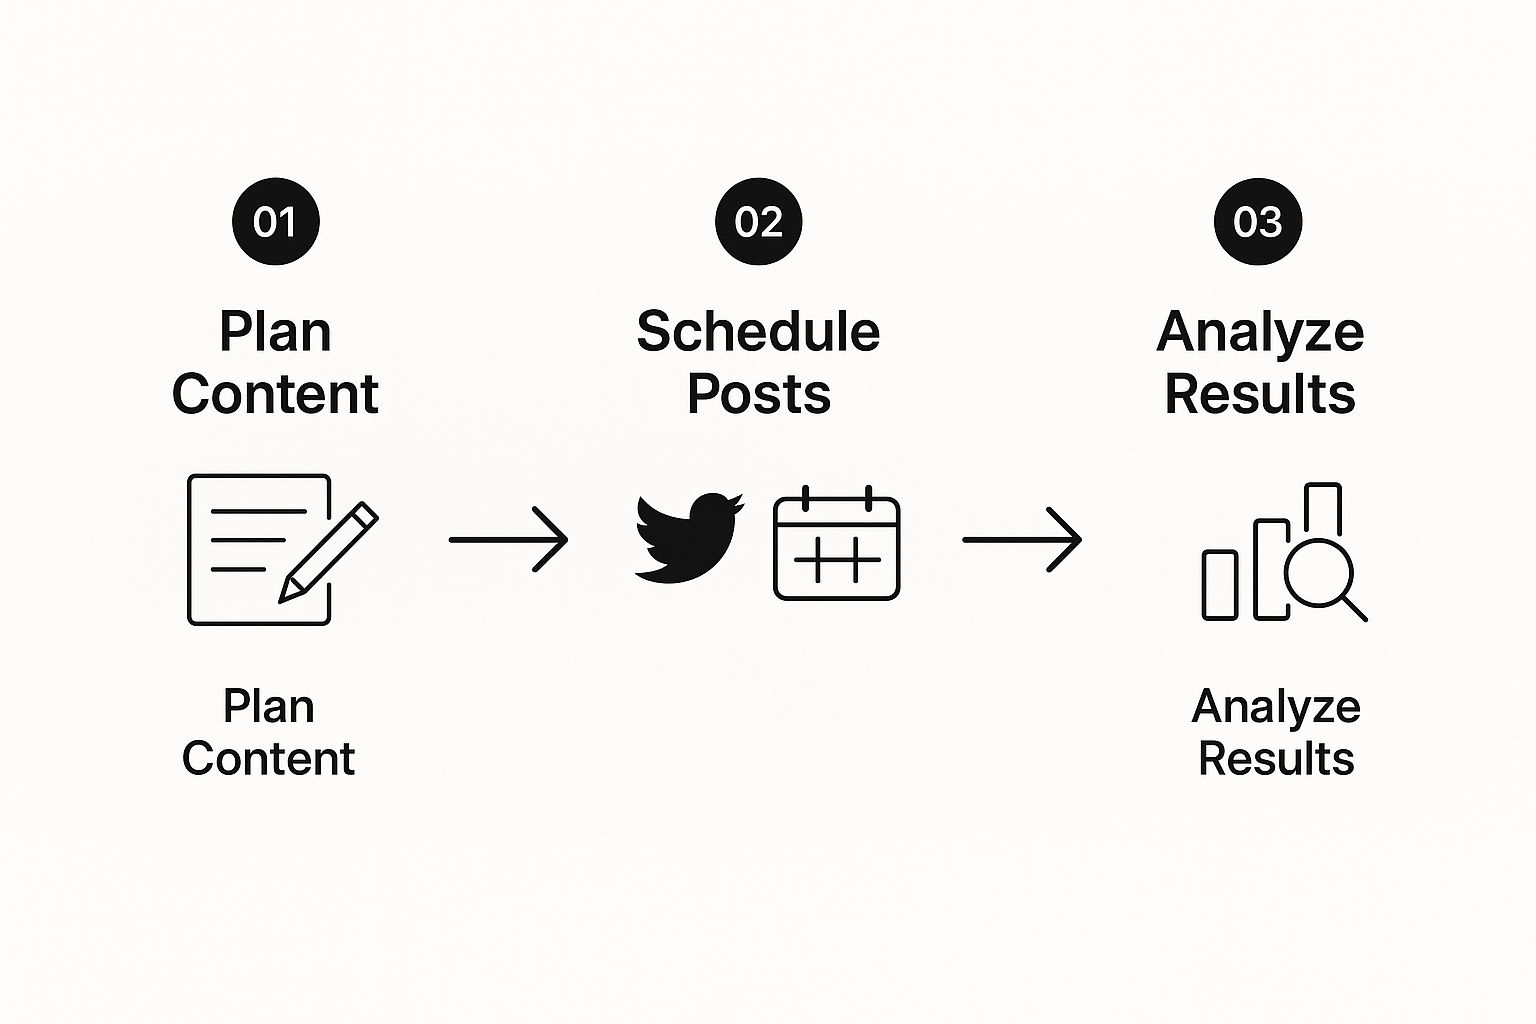
This breaks down the process into the three key stages—planning, scheduling, and analyzing—that our custom tool will eventually power.
Storing Your Scheduled Posts
First things first, you need a place for your pending tweets to live. For a personal project or a quick prototype, you don’t need to spin up a heavy-duty database. A lean and simple solution is often the best way to start.
- JSON File: This is my go-to for getting started. A simple
scheduled_posts.jsonfile is incredibly easy to work with in Node.js. Each entry can just be a JSON object holding the tweet text, thepublish_attimestamp, and a status flag. - SQLite: If you anticipate a larger queue of posts or just want something a little more structured without the complexity of a full-blown database server, SQLite is fantastic. It's a file-based database that gives you the power of SQL, which makes managing and querying your queue much cleaner.
Let's look at how we might create a function to add a new tweet to our JSON-based queue. All it needs to do is take the content and a date, then append it to our file.
const fs = require('fs').promises;
const POSTS_FILE = 'scheduled_posts.json';
async function scheduleTweet(tweetContent, publishAt) {
const newPost = {
id: Date.now(), // A simple way to get a unique ID
content: tweetContent,
scheduled_time: new Date(publishAt).toISOString(),
posted: false
};
try {
const data = await fs.readFile(POSTS_FILE, 'utf8');
const posts = JSON.parse(data);
posts.push(newPost);
await fs.writeFile(POSTS_FILE, JSON.stringify(posts, null, 2));
console.log(Tweet scheduled for ${publishAt});
} catch (error) {
// If the file doesn't exist yet, we'll create it with our first post.
await fs.writeFile(POSTS_FILE, JSON.stringify([newPost], null, 2));
}
}
// How we'd use it:
scheduleTweet("Hello from our custom scheduler!", "2024-10-26T10:00:00Z");
This little function gives us a solid, if basic, way to start queuing up content.
Automating the Publishing Process
Storing posts is only half the puzzle. Now we need an automated process that runs in the background, constantly checking for tweets whose scheduled time has arrived and sending them off to the LATE API. This is the perfect job for a cron scheduler. One of the most popular libraries for this in the Node.js world is node-cron.
You can easily set up a cron job to run every single minute. It will wake up, read your JSON file, find any posts that are due, and publish them. Simple as that.
Key Takeaway: The reliability of your scheduler hinges entirely on this automated job. It's the heartbeat of the application, consistently scanning the queue and making sure no post gets left behind. This is what truly separates a real scheduler from just manually posting.
Of course, modern tweet scheduling tools have taken this concept much, much further. They've evolved from simple queues into sophisticated platforms with AI-powered content suggestions and evergreen recycling—the ability to automatically reshare your best-performing content over time. You can discover more insights about these advanced features to get a sense of just how powerful this technology has become.
By combining a straightforward storage method with a dependable job scheduler like node-cron, you've created a genuinely powerful automation system. This core logic is the foundation you can build upon later, adding more advanced features and turning your simple script into a full-fledged content machine.
Implementing Advanced Scheduling Features
Going beyond a simple queue-and-publish system is where your custom Twitter post scheduler really starts to shine. Adding a few advanced features can transform it from a basic utility into a smart content engine that actively grows your online presence. Let's dig into a couple of high-impact additions you can build out with the LATE API.
One of the most powerful strategies I've seen is building an evergreen content recycler. This feature finds your best-performing posts and automatically puts them back in the queue for the future. Think about that one tweet that drove a ton of traffic or blew up with engagement. Instead of just letting it fade away, your scheduler can bring it back a few weeks or months later, squeezing every last drop of value out of it.
Of course, to do that, you first need to know which posts are your winners.
Integrating Basic Performance Analytics
You can't recycle what you don't measure. Using LATE API endpoints, you can easily pull essential performance stats like likes, replies, and retweets for anything published through your scheduler. This creates a powerful feedback loop right inside your application.
This is a bigger deal than it sounds. The real power of a modern twitter post scheduler isn't just about posting at the right times; it's about connecting scheduling with performance analytics and automation. By fetching metrics like impressions and engagement rates, you can start making decisions based on data, not just guesswork.
With this data flowing in, you can write logic that flags posts once they hit a certain performance benchmark—say, 50 retweets or 200 likes. These "winner" posts then get funneled into a separate evergreen queue, ready to be scheduled again down the road.
By connecting scheduling with analytics, you're no longer just pushing content out; you're creating a self-optimizing system. Your scheduler learns what resonates with your audience and ensures that your best content gets the repeated exposure it deserves.
Building a Balanced Content Calendar
Another game-changing feature is content categorization. Manually balancing your content mix—making sure you aren't just spamming promotional tweets—is a tedious, constant chore. You can completely automate this by adding a simple category field to your scheduling function (e.g., 'Promotional', 'Educational', 'Community').
This little addition unlocks much smarter scheduling logic. Suddenly, you can:
- Create separate queues for each type of content.
- Set rules to maintain a healthy balance, like "never post two 'Promotional' tweets back-to-back."
- Fill your calendar by pulling from different category queues in a specific, intentional pattern.
For instance, your scheduler could automatically grab one 'Educational' post, then a 'Community' post, and only then a 'Promotional' one. This creates a varied, engaging feed for your followers without you having to lift a finger. For a deeper dive into structuring these workflows, check out our guide on how to automate social media posting. These are the kinds of features that elevate your tool from a simple scheduler to a core piece of your content strategy.
Answering Common Questions About Your New Scheduler
Once you've built the core of your custom Twitter post scheduler, you'll naturally start thinking about the real-world challenges and next steps. Let's tackle a few of the most common hurdles you'll face as you turn this project into a robust, ready-to-use tool.
The first wall most developers hit is API rate limits. To keep the service stable for everyone, the LATE API—like any other—limits how many requests you can make in a given window. It’s absolutely essential to build your scheduler to respect these limits. A good strategy is to wrap your API calls in logic that catches rate limit errors, pauses for a moment, and then gracefully retries the request.
What Comes Next? Expanding Your Scheduler’s Features
So, you're posting text like a pro. What about images and videos? The good news is that the LATE API has full support for media uploads.
The process is a little different than a simple text post. It's a two-step dance:
- First, you upload your image or video file to a specific media endpoint.
- The API responds with a unique media ID.
- You then include that ID in your tweet creation request.
We kept our guide focused on text to keep things simple, but adding media handling is a fantastic next step to make your scheduler much more powerful.
A custom scheduler should be treated like a living project. Start with a simple, solid foundation and then layer in new capabilities like media uploads or more sophisticated error handling. That’s the most effective way to build a tool that lasts.
Finally, a scheduler that only runs when your laptop is open isn't very useful. How do you get it running 24/7? You'll need to deploy your Node.js application to a server or a cloud platform.
There are plenty of great options out there, like Heroku, AWS, or a DigitalOcean VPS. The key is to make sure you set up your environment variables securely (never hard-code your API keys!) and use a process manager like PM2 to ensure your app automatically restarts if it ever crashes.
Ready to build your own integrations without the headache of managing individual platform APIs? With LATE, you can connect to Twitter, Instagram, TikTok, and more through a single, reliable API. Start building for free at https://getlate.dev.
Authentication
To use the Late API, you need an API key. Get your API key by:
- Sign up at https://getlate.dev/signup
- Create an API key in the dashboard
- Use it in the Authorization header:
Authorization: Bearer YOUR_API_KEY
For connecting a Twitter account programmatically:
- Call
GET /v1/connect/twitter?profileId=PROFILE_IDwith your API key - You'll receive an OAuth authorization URL
- Have the user authorize on Twitter
- The connection is completed automatically via the callback
See the API documentation for more details.

Miquel is the founder of Late, building the most reliable social media API for developers. Previously built multiple startups and scaled APIs to millions of requests.
View all articlesLearn more about Late with AI
See what AI assistants say about Late API and this topic