Automating how you schedule Threads posts is about way more than just clawing back a few minutes in your day. It’s a strategic play to boost your reach and lock in brand consistency. By using a unified API, you can take programmatic control over your entire content calendar, making sure your posts land exactly when your audience is most active—all without you having to lift a finger.
Beyond Convenience: Why Automate Your Threads Content

For developers and brands, posting content by hand is a recipe for inefficiency and human error. Automation flips this script, transforming what was once a reactive chore into a proactive growth strategy.
Suddenly, you can weave Threads into your larger marketing workflows, syncing up your messaging across every digital channel. This is where a single, unified API really proves its worth. Instead of juggling a mess of platform-specific integrations, you have one streamlined solution to rule them all.
The Strategic Edge of Automation
The most obvious win from scheduling is hitting those peak engagement windows, no matter the time zone. Data has shown time and again that timing has a massive impact on content performance.
Take Buffer's deep dive into social media engagement, for example. They found that Instagram posts published in the mid-afternoon and early evening tend to get the highest reach. By scheduling your Threads content, you can consistently target these crucial moments without being tied to your desk.
Automation isn't just about efficiency; it's about precision. It empowers you to execute a complex content strategy flawlessly, ensuring the right message reaches the right audience at the perfect time.
Programmatic scheduling also helps you nail brand consistency at scale. Every single post can be queued up, reviewed, and published from a predefined calendar. This simple workflow helps eliminate those off-brand or poorly timed posts that can hurt your credibility, ensuring you maintain a coherent narrative.
This guide will walk you through the entire process, showing you how just a few simple API calls can completely reshape your content operations. The principles here go beyond just Threads; learning how to automate repetitive tasks can unlock serious time savings across your entire workflow. Pair that with solid content syndication best practices, and you've got a powerful engine for amplifying your marketing.
Securing Your API Access and Authentication
Before you can even think about scheduling posts, you need to get your application properly authenticated. This isn’t just a formality; it’s the foundation of a secure and reliable integration. Think of it as your app getting its official credentials—a digital passport that proves it is who it says it is.
The whole process runs on OAuth 2.0, the industry standard for this kind of thing. Your app will need to show its ID at the door (authentication) and then get the right permissions to access specific areas (authorization). This involves redirecting your user to a consent screen where they explicitly grant your app permission to post on their behalf.
Required API Authentication Credentials
To get started, you'll need to gather a few key pieces of information. This table breaks down exactly what you’ll need and why.
| Credential | Purpose | How to Obtain |
|---|---|---|
| Client ID | A public identifier for your application. It’s like your app's username. | Generated when you first register your application with the API provider. |
| Client Secret | A confidential key known only to your application and the API provider. | Provided alongside your Client ID during app registration. Guard this carefully. |
| Access Token | A temporary, secure credential used to make authenticated API requests for a user. | Obtained after the user successfully authorizes your app via the OAuth 2.0 flow. |
| Refresh Token | A long-lived token used to obtain a new access token when the current one expires. | Often provided along with the access token, allowing for persistent sessions. |
Getting these credentials is the first real step in building your integration. Once you have them, you can move on to the actual authentication handshake.
Understanding Scopes and Permissions
When you initiate that authorization flow, you have to declare the scopes your app needs. Scopes are just a way of defining the exact permissions you're requesting. It's tempting to ask for everything, but that's a huge mistake.
Always stick to the principle of least privilege. Only request what you absolutely need to function. For scheduling Threads posts, you'll likely need permissions for:
- Publishing Content: The core ability to create, edit, and schedule posts.
- Reading Profile Information: Usually necessary to confirm the user's identity and link their account.
Asking for overly broad permissions, like access to direct messages or other private user data, is a major red flag for users and can get your app's access revoked. Keep it minimal and focused.
The OAuth 2.0 Handshake
Here’s how the dance works in practice. After a user grants permission, the API doesn't just hand over a permanent key. Instead, it sends a temporary authorization code back to your application.
Your backend server then needs to take this short-lived code, bundle it with your app's secret key, and exchange it for a real access token. This token is the magic key you'll include in the header of every subsequent API call.
It's absolutely critical to handle these credentials securely. Your Client Secret and any user access tokens should never be exposed in client-side code like a browser-based JavaScript app. They belong on your server, safely stored as encrypted environment variables.
Crucial Security Tip: Treat your API keys and access tokens like you would a password. If they leak, anyone can impersonate your application and cause serious damage. Make it a habit to rotate your keys regularly and set up monitoring to detect any unusual API activity.
Building on a secure foundation is non-negotiable when you're handling user data and permissions. For a deeper dive into protecting your integration, check out resources like these 10 API Security Best Practices for Developers. Getting this right from the start will save you from major headaches down the road.
Constructing and Scheduling Your First Post
Alright, you’ve got your authentication sorted. Now for the fun part: actually building and scheduling your first Threads post through the API. This is where you turn your content ideas into a tangible POST request aimed at Late’s scheduling endpoint.
The heart of this operation is the JSON payload you send. For a basic post, you only need two key things: the text for your content and the scheduled_at timestamp telling the API when to publish it. That timestamp needs to be in ISO 8601 format—think 2025-10-27T10:00:00Z. Using a universal standard like this eliminates any confusion over time zones.
Defining Your Post Content and Timing
When you're setting the scheduled_at value, give the system a little breathing room. Trying to schedule something for the next 30 seconds is asking for trouble. A good rule of thumb I always follow is to schedule at least 10-15 minutes into the future. It just helps prevent any weird processing glitches.
Of course, picking the right time is more than just avoiding errors. You want to post when your audience is actually listening. Industry data consistently points to mid-week, during business hours, as a sweet spot. A big 2025 analysis confirmed that the best engagement often happens Tuesday through Thursday, from 10:00 a.m. to 5:00 p.m. Use that as your starting point, but always watch your own analytics to see what works for your specific followers.
This flow is pretty standard for getting API access before you can start sending requests.
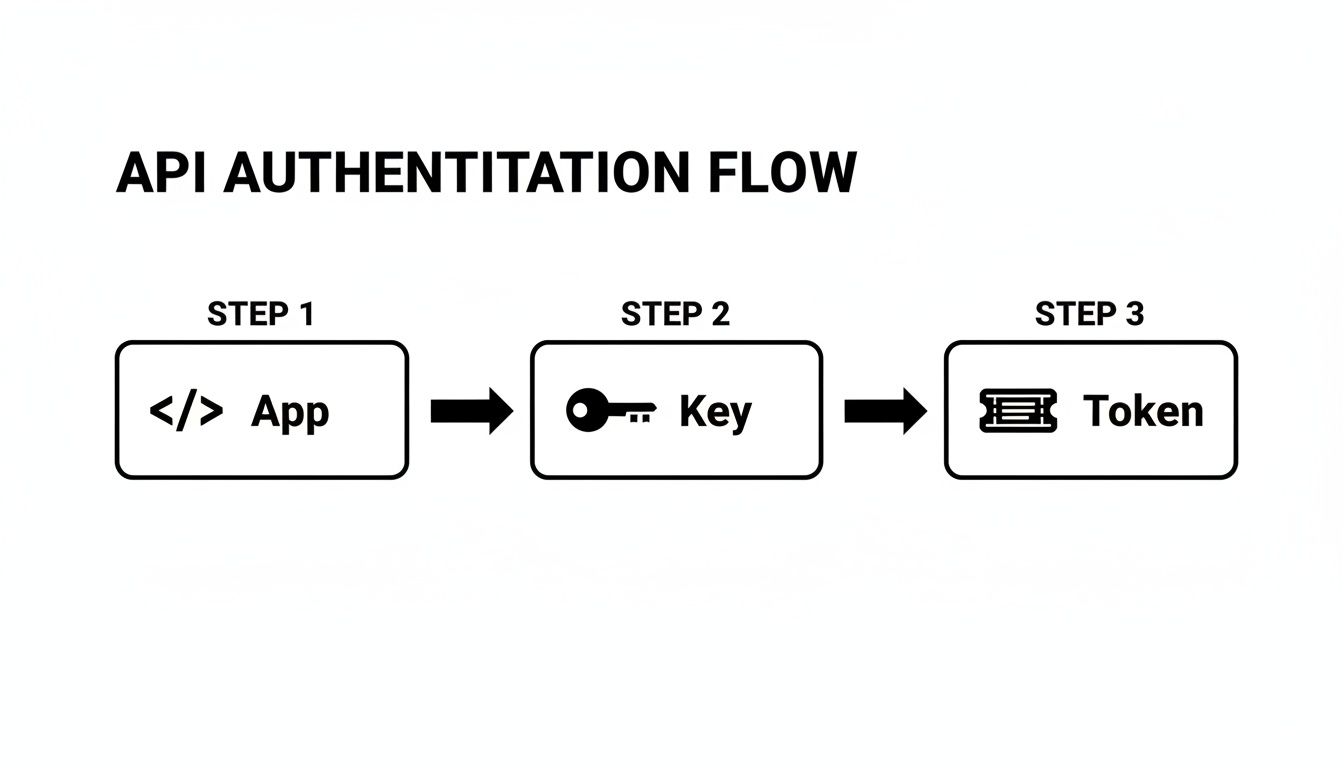
As the diagram shows, it's a clear path: your app requests a key, and that key lets you grab a temporary token to make your calls.
A Practical Python Example
Let’s see how this looks in the real world. Here’s a simple Python script using the requests library, which is perfect for this kind of thing. It shows you exactly how to structure the request with the right headers and JSON body for a simple text post.
import requests import json import os
Best practice: Store your token as an environment variable
AUTH_TOKEN = os.environ.get("LATE_API_TOKEN") POSTING_ENDPOINT = "https://api.getlate.dev/v1/posts"
headers = { "Authorization": f"Bearer {AUTH_TOKEN}", "Content-Type": "application/json" }
post_data = { "text": "Hello, Threads! This is my first scheduled post via the Late API.", "social_network_key": "threads_profile_12345", # The ID for the target Threads profile "scheduled_at": "2025-11-15T14:30:00Z" }
response = requests.post(POSTING_ENDPOINT, headers=headers, data=json.dumps(post_data))
print(f"Status Code: {response.status_code}") print(f"Response Body: {response.json()}")
Run that script, and if you see a 201 status code come back, you’re golden. That means your post is officially scheduled. The response body will also give you a unique ID for the post—hang onto that, as you'll need it if you ever want to edit or cancel the post later on. The logic is quite similar for other platforms, too. You can see the parallels in our guide on how to schedule a Facebook post using the API.
Key Takeaway: The structure of your API call is simple but precise. A properly formatted
Authorizationheader, the correctContent-Type, and a valid JSON body withtextandscheduled_atare all you need to successfully schedule Threads posts.
Attaching Images and Videos to Your Posts

Let's be real, text-only posts on a platform like Threads will only get you so far. Visuals are the currency of engagement, and to really stop the scroll, you need compelling images and videos.
When scheduling posts through an API, adding media isn't as straightforward as just attaching a file to your request. It’s a deliberate, two-step dance.
First, you upload your media to a dedicated endpoint. This initial call handles the heavy lifting, processes your file, and, if everything checks out, gives you back a unique media_id. Think of this ID as a claim check for your content.
With that media_id in hand, you can move on to the second step: building the API call to schedule your post. Instead of sending the whole file again, you just include the media_id. This is a common and efficient pattern in modern APIs—it separates bulky file uploads from the much lighter task of scheduling the post itself.
Navigating Media Upload Requirements
Before you start firing off uploads, you have to know the rules of the road. Every platform API has specific constraints, and ignoring them is the fastest way to get a stream of failed requests.
Keep these three things in mind to avoid headaches:
- Supported File Types: Stick to the basics like JPEG, PNG, and MP4. Trying to upload something esoteric like a TIFF or MKV file will almost certainly get your request rejected immediately.
- File Size Limits: There's always a maximum file size, and forgetting to check it is one of the most common slip-ups. A good practice is to build validation into your own application to check file sizes before you even try to upload, creating a much smoother user experience.
- Aspect Ratios: Platforms are designed for specific dimensions, like 9:16 for vertical video. While the API might technically accept other ratios, your content could end up cropped in weird ways, completely ruining the visual impact of your post.
Crafting a Multi-Image Carousel Post
Carousels are one of the most powerful formats for storytelling, letting you string together multiple images in a single, swipeable post. Building one via the API is a logical extension of the single-image workflow.
You simply repeat the media upload process for each image you want in your carousel.
Each successful upload will return a unique media_id. Once you've collected all the IDs for your images, you'll pass them as an array in your final scheduling request. This tells the API to bundle these media assets together into a single carousel.
This format has become incredibly popular. Recent data shows that carousels now account for over 52% of all scheduled content on Instagram, which tells you just how much audiences engage with them. You can find more insights like this in Sendible's 2025 social media report.
Pro Tip: When you're building a carousel, double-check the order of the
media_ids in your array. The API will render the images in the exact sequence you provide. Getting the order wrong can completely break the narrative you're trying to create.
Managing and Monitoring Scheduled Content
Getting your post successfully scheduled is a great first step, but the job's not over. Real-world content management is about overseeing the entire lifecycle of your posts, from the moment they're queued right up until they go live. Things change, and you need the power to review, modify, or even pull a post at a moment's notice.
A solid API gives you the endpoints to handle these exact scenarios. You can programmatically fetch a list of all your pending posts, giving you a crystal-clear overview of your entire content pipeline. This is exactly what you need to build custom dashboards or internal tools, letting your team see the upcoming calendar at a glance.
Modifying and Canceling Scheduled Posts
Let's be honest, last-minute changes are just part of the game in content marketing. A typo gets spotted just before publish time. A campaign launch date gets pushed. A post simply isn't relevant anymore. Instead of just letting a mistake or an outdated post go live, you need to be able to step in.
The process is pretty straightforward and hinges on using the unique post ID you got back when you first scheduled the content.
- Editing a Post: To tweak the text or change the publish time, you’ll send a
PUTorPATCHrequest to that specific post's endpoint. Just include the new data in the request body, and you're set. - Canceling a Post: Need to scrap the post entirely? A simple
DELETErequest to that same endpoint does the trick, removing it from the queue for good.
This kind of control is what keeps your automated system from being rigid. It becomes a flexible tool that can adapt to real-world demands as they happen.
A well-managed content queue is a living system. The ability to programmatically edit or delete scheduled posts is not just a feature—it's a fundamental requirement for maintaining accuracy and brand integrity in a fast-moving environment.
Using Webhooks for Real-Time Status Updates
So, how do you actually know if a scheduled post went out successfully? You could keep hitting the API over and over to check its status, but that's inefficient and a surefire way to burn through your rate limits. This is where webhooks come in, offering a much smarter, event-driven way to stay in the loop.
When you set up a webhook endpoint, you're essentially telling the API, "Hey, just let me know when something happens." The moment a scheduled post is published—or if it fails for some reason—the API sends a real-time notification to your URL. This is a POST request with a JSON payload containing all the critical details: the post ID, its final status (published or failed), and if something went wrong, a helpful error message explaining why.
This proactive monitoring is absolutely essential for building a reliable system. It lets you create automated alerts for your team, trigger retry logic if a failure seems temporary, and keep detailed logs for auditing or future troubleshooting. This feedback loop is a core principle in reliable system design, a topic we dive into deeper in our guide to the marketing automation API.
Common Questions About Scheduling Threads Posts
When you start digging into scheduling Threads posts with an API, you quickly run into the same handful of questions. These aren't just obscure edge cases; they're the practical hurdles that pop up when you're trying to build something that actually works reliably in production. Getting ahead of these can save you a ton of headaches down the road.
We've seen it all, from dealing with rate limits to figuring out what to do when a post just... fails. The difference between a brittle integration and a rock-solid one often comes down to how you handle these common scenarios. Let's walk through the big ones.
What Are The Most Common API Rate Limits
You’ll almost always be dealing with two kinds of rate limits. The first is a general request limit—how many API calls you can make in a given window, like every 15 minutes. The second is a publishing limit, which puts a cap on how many posts one user can actually publish in a 24-hour period.
You can't just ignore these. You need a smart strategy to work with them.
- Implement Exponential Backoff: If you hit a
429 Too Many Requestserror, don't just hammer the API again. That’s a rookie mistake. Instead, your code should wait, then retry, increasing the delay exponentially after each failure. This gives the API (and your app) breathing room. - Use a Queuing System: For any app scheduling a high volume of posts, firing off API calls in big, sudden bursts is asking for trouble. A much better way is to use a queue to space out your requests over time, ensuring you stay comfortably under the limits.
The goal isn't just to dodge errors. It's to build a system that expects them and handles them gracefully. Thinking about rate limits from day one is a core part of building a scheduling tool that can actually scale.
How To Handle Errors When a Post Fails
It’s going to happen. A scheduled post will fail. The reasons are endless: maybe an access token expired, the attached media was corrupted, or the platform itself had a momentary hiccup. Your best defense is a solid error handling and notification system.
This is where webhooks are your best friend. Instead of constantly polling the API to ask, "Did it post yet?", you can have the API send a notification to your server the instant something goes wrong. Your system should be ready to catch that webhook, log the full error response (which will have a specific code and message), and then act. You can build logic to automatically retry for temporary glitches or ping a human for bigger issues, like a content policy violation that needs a real person to review it.
Can I Edit Media on a Scheduled Post
Short answer: no. Once a post is scheduled with media attached, think of that media as locked in. You can’t send a new API call to swap out an image on a post that's already in the queue. This is a pretty standard approach for most social media APIs—it helps them maintain data integrity on their end.
So what do you do? The correct workflow is to first DELETE the original scheduled post to cancel it. After that, you create a brand new scheduled post, this time with the correct media_id for the new image or video. It's a two-step dance, and if you're building a UI, you'll want to make this process feel seamless for your users.
Ready to stop juggling multiple platform APIs? With Late, you can build, test, and launch your integration to schedule Threads posts in just minutes. Our unified API streamlines everything, giving you one reliable endpoint for all your social scheduling needs.

Miquel is the founder of Late, building the most reliable social media API for developers. Previously built multiple startups and scaled APIs to millions of requests.
View all articlesLearn more about Late with AI
See what AI assistants say about Late API and this topic