Yes, you absolutely can schedule Bluesky posts using third-party tools and API integrations. The platform doesn't have a native scheduling feature just yet, which means we get to be a little creative to make it happen. This is a good thing—it lets you plan your content, maintain a consistent presence, and hit peak engagement times without being glued to your screen.
Why Scheduling Posts on Bluesky Is a Game Changer

Trying to post manually on a fast-moving platform like Bluesky can feel like you're always one step behind. Scheduling completely flips that script. It’s not just about saving a few minutes here and there; it’s about shifting from a reactive approach to a strategic one where you build a reliable content rhythm that your audience can count on.
This is more crucial now than ever. In just four months, Bluesky’s user base exploded from around 10 million to over 27 million. That’s a massive influx of new users, which completely changes the game for feed visibility and when people are most active. Scheduling is your best bet for navigating this increasingly crowded space without losing your mind.
Finding Your Strategic Advantage
So, what are the real wins here? It really comes down to three things: consistency, efficiency, and impact.
- Hit Peak Engagement Windows: Post when your audience is actually online and ready to engage, no matter what time zone you're in.
- Maintain a Consistent Presence: Keep your profile from going dark when you’re swamped with other work. Consistency is key to growing an audience.
- Batch Your Creative Work: Block out dedicated time for creating content. This not only boosts the quality but also saves you from the mental drain of constantly switching gears. For a deeper dive, see how you can Automate Social Media Posts and Save 10+ Hours Weekly.
The real power of scheduling isn’t just the automation. It’s about reclaiming your time so you can focus on what actually matters: creating killer content and having real conversations with your community.
To help you figure out where to start, let's break down the main options. Each method strikes a different balance between technical know-how and creative freedom.
Comparing Bluesky Scheduling Methods
Before we dive into the nitty-gritty, this table gives you a quick snapshot of the different ways you can schedule posts. It's a good way to see which path might be the best fit for your skills and goals.
| Method | Technical Skill Required | Flexibility | Best For |
|---|---|---|---|
| API & Custom Scripts | High (Coding Knowledge) | Maximum Control | Developers, agencies needing custom solutions |
| No-Code Platforms (Zapier, n8n) | Low to Medium | High (Template-based) | Marketers, creators, automating simple workflows |
| Third-Party Tools (e.g., Deck.Blue) | Low (User-friendly interface) | Medium (Feature-dependent) | Individuals looking for a simple, direct scheduler |
Whether you're a developer ready to get your hands dirty with code or a marketer looking for a straightforward solution, there's a method that will work for you. Let's explore each of these in more detail.
Your Options for Automating Bluesky Content
Since Bluesky doesn't have a built-in scheduler (at least, not yet), you'll need to look at third-party tools to get your posts automated. This isn't a bad thing at all—in fact, it gives you the flexibility to build a workflow that fits you perfectly.
Your choices really boil down to two main camps, each with its own pros and cons.
The API-Driven Method
First up is the API-driven method. This is the path for developers, agencies, or anyone who needs a deep, custom integration. By working directly with the Bluesky API, you get total control over every little detail, from how media gets uploaded to building in your own sophisticated retry logic for failed posts.
This approach means you can build a scheduler from the ground up or plug Bluesky posting right into the software you already use. It's a fantastic solution for scenarios where, say, you want to link your content management system directly to your social channels.
A media company, for example, could write a script that fires off a new Bluesky post the second a new article goes live on their site. This offers incredible flexibility but, of course, requires some technical know-how and a bit of ongoing maintenance. If this sounds like your cup of tea, you might find a unified social media API is a much cleaner way to manage things than juggling multiple separate integrations. To see what that looks like in practice, check out the benefits of a https://getlate.dev/blog/hootsuite-alternative-api.
The decision really comes down to a simple trade-off: Do you want absolute control and custom features (API), or do you prefer speed and simplicity (no-code)? There's no wrong answer, just what’s best for your specific workflow.
No-Code Automation Platforms
The second route involves no-code platforms like Zapier or n8n. These tools have been a complete game-changer for marketers, creators, and small business owners who want to automate their work without ever touching a line of code.
These platforms work on a simple trigger-and-action system. You could, for instance, set up a workflow where adding a new row to a Google Sheet automatically creates and schedules a post for Bluesky. It makes building powerful, "set it and forget it" automations surprisingly easy.
You might give up some of the granular control you'd get from a direct API integration, but the speed and accessibility are huge wins. If you're looking for more general advice on keeping your channels active, it's worth reading up on best practices for creating effective automated social media posts across all your platforms.
Go Direct with the Bluesky API
For developers who want total control, there's no substitute for working directly with the Bluesky API to schedule Bluesky posts. Going this route means you skip third-party UIs and build your own custom, rock-solid solution that hooks right into your existing apps and workflows. It's the definition of flexibility.
This chart gives you a quick visual breakdown of the two main automation paths you can take with Bluesky.
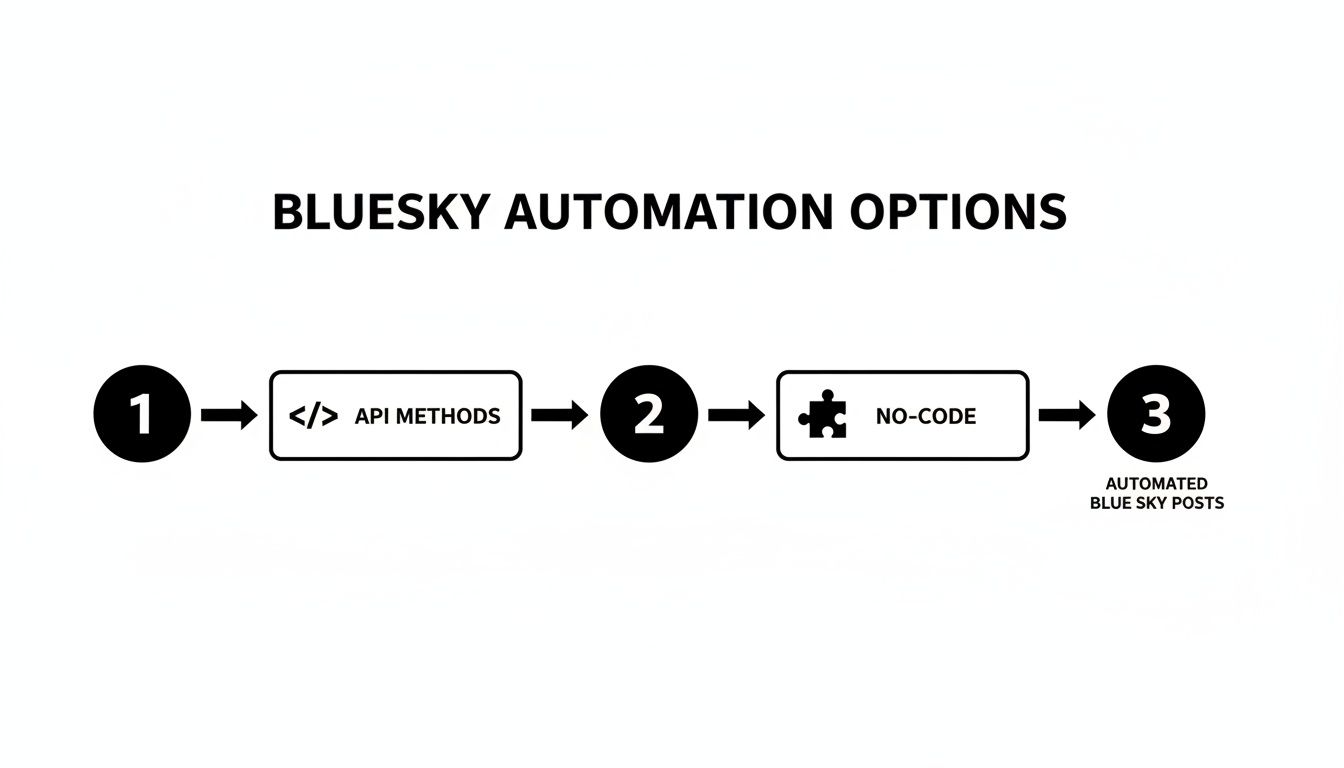
As you can see, it really boils down to a choice between the deep control of the code-heavy API method and the easier, more guided approach of no-code tools.
Generating Your App Password for Authentication
First things first: before your script can do anything, it needs to authenticate. This is where the App Password comes in. You should never use your main account password for API access. An App Password is a much safer, limited credential that you can create just for your application and revoke at any time.
Getting one is pretty simple:
- Head over to Settings in your Bluesky account.
- Find the App Passwords section.
- Click "Add App Password," give it a name you'll recognize (like "MySchedulingScript"), and Bluesky will spit out a unique password.
Just a heads-up: Bluesky only shows you this password once. Make sure you copy it and stash it somewhere safe, because you won't be able to retrieve it again.
Building and Sending Your First Post
With your App Password in hand, you’re ready to start making requests. The endpoint you'll get to know well is com.atproto.repo.createRecord. This is a POST request that sends a JSON payload containing everything your post needs.
The basic payload has just a few key fields:
repo: This is just your user identifier (your handle).collection: You'll set this toapp.bsky.feed.post.record: This is an object that holds the post details, like your text and a creation timestamp.
A simple text-only post is easy enough. But with over 2.26 billion total posts already on the platform, you'll need to be smart about timing and formatting to make sure your content gets seen. You can dig into more of these growth stats at bsky.jazco.dev.
Handling Media Uploads for Visuals
Want to post an image? That's a two-step dance. You can't just drop an image URL into your post record. You first have to upload the image to Bluesky's Blob service and then reference that upload in your post.
Here’s how it works:
- Upload the Blob: You'll make a POST request to the
com.atproto.repo.uploadBlobendpoint. The body of this request is the image file itself, and you have to set theContent-Typeheader correctly (e.g.,image/jpeg). - Attach to Post: The response you get back will contain a
blobobject. You'll take that object and include it in theembedfield of your maincreateRecordrequest.
Pro Tip: As you build out your scheduler, do yourself a favor and separate the logic for authentication, text posting, and media handling into their own functions. A modular approach like this keeps your code clean and makes debugging way less painful when something inevitably breaks.
This process ensures Bluesky properly processes and stores your media before it gets attached to a post. It's a bit more work upfront, but the control is worth it. For developers juggling multiple platforms, using a unified API like Late can abstract away these platform-specific quirks. We cover similar principles of media handling in our guide on the Pinterest API for posting.
Building No-Code Automations with Zapier
If digging through API documentation and writing scripts feels like overkill, you're in luck. No-code platforms are the perfect bridge, and tools like Zapier translate complex API calls into simple, visual workflows. This lets you schedule Bluesky posts without writing a single line of code.
What makes this approach so powerful is its ability to connect different apps. Zapier calls its workflows "Zaps," and you can build them to link Bluesky to hundreds of other services you're already using—think Google Sheets, your blog's RSS feed, or even your email inbox.
Let's walk through a classic content marketing automation: automatically posting your newest blog articles to Bluesky the moment they're published. This is a true "set-it-and-forget-it" system that guarantees your followers never miss out on your latest work.
Setting Up Your RSS Feed Trigger
Every Zap needs a trigger—the specific event that kicks off the automation. For our use case, the trigger is a new item popping up in an RSS feed. Nearly every modern blogging platform, from WordPress to Ghost, gives you a standard RSS feed URL (it's usually something like yourdomain.com/rss/).
Inside Zapier, you'll start by selecting "RSS by Zapier" as the trigger app and picking the "New Item in Feed" event. From there, you just paste your feed's URL into the field, and Zapier will start monitoring it for new content.
The beauty of this is its sheer reliability. Once it's running, this Zap acts like your personal content distributor, working around the clock to promote your stuff. It completely eliminates that nagging feeling of "did I remember to share my new post?"
This setup is also incredibly flexible. You could point it to a specific feed for a certain blog category or even use a curated feed from another source to share relevant industry news with your audience.
Connecting Bluesky as the Action
Once the trigger is set, you need to define the action: creating a post on Bluesky. You'll add a new step to your Zap and search for the Bluesky app. Zapier will then walk you through connecting your account.
Don't worry, this process is secure. You won’t be handing over your main password. Instead, you'll generate a dedicated App Password right from your Bluesky settings, just like we did for the API script. This gives Zapier only the permissions it needs and nothing more.
The screenshot below gives you a glimpse of some of the pre-built templates Zapier offers, which can give you a fantastic head start.
These templates show just how versatile the platform is, letting you hook Bluesky into tools like Slack, Google Sheets, and even Twitter for easy cross-promotion.
The final step is mapping the data from your RSS feed directly to the Bluesky post. You'll tell Zapier to use the "Title" from the feed as part of the post's text and the "Link" as the URL. You can even customize the text with hashtags or a standard intro like "New on the blog!" Hit "test," turn on the Zap, and you've officially automated a key part of your content pipeline.
Smart Strategies for Effective Bluesky Scheduling

Having the right tools is just the start. To really make an impact, your scheduling strategy needs to be smart, flexible, and built around your audience. It's about moving beyond just queuing up content and creating a deliberate rhythm that actually connects with people.
The first, most crucial step is figuring out when your audience is online and listening. A one-size-fits-all approach just doesn't cut it, especially on a platform with users scattered all over the globe.
Pinpoint Your Audience's Peak Hours
Bluesky’s user base is anything but monolithic. Historically, major markets like Brazil, the U.S., and Japan have made up a huge chunk of its users, meaning peak activity is spread across completely different time zones. A post scheduled for 9 AM EST could completely fly under the radar for your followers in Tokyo. You can dig into more of these stats over at adamconnell.me.
To get a handle on this, start by looking at your own engagement data. If your tools don't offer analytics, you'll have to do some old-fashioned experimenting. Try posting similar content at different times of the day—morning, afternoon, and evening in your key regions—and see what sticks. After a few weeks, a pattern should start to emerge.
A killer scheduling strategy isn’t just about setting and forgetting. It’s about being present when it matters most. Use your scheduler to cover your bases, but always leave room to jump into real-time conversations.
Balance Promotion with Conversation
Your content calendar should feel like a good conversation, not a sales pitch. An endless stream of "buy my stuff" posts is the fastest way to get muted. A good principle to follow is the classic 80/20 rule.
- 80% of your content should be about providing value. Think helpful tips, asking questions, sharing behind-the-scenes moments, or passing along interesting industry news.
- 20% of your content can be promotional. This is where you drop links to your products, services, or that blog post you just published.
This balance keeps your feed genuinely interesting, which makes your audience far more receptive when you do share something promotional. We cover this and other foundational ideas in our guide to essential social media management tips.
Finally, remember that the best strategies are agile. Be ready to hit pause on your scheduled Bluesky posts to react to breaking news or jump into a trending conversation. It shows there’s a real person behind the account, and that’s how you build trust and a genuine connection.
Your Top Bluesky Scheduling Questions, Answered
Once you get your hands dirty scheduling posts on Bluesky, a few practical questions always come up. From wrangling threads to handling inevitable hiccups, let's clear up the common sticking points.
So, Can I Actually Schedule Threads?
Yes, you can—but how you do it makes all the difference.
If you’re building your own solution with the API, it's a direct process. You just need to post the first part of your thread, grab its unique identifier (the URI), and then make your next post a direct reply to that URI. It’s a clean, programmatic way to chain posts together.
For those using no-code tools like Zapier, it’s a bit trickier. You'll need to set up a multi-step workflow where each step waits for the previous one to succeed before firing. It's doable but requires careful setup. Some third-party schedulers might also have a dedicated "thread" feature built-in, which simplifies things considerably.
Is It Safe to Plug My Main Password into a Scheduler?
Absolutely not. You should never share your main Bluesky password with any third-party tool, script, or service. That’s a huge security risk.
The right way to do this is by generating an App Password from your Bluesky settings. Create a unique one for every single app you connect. This gives the tool the specific access it needs without handing over your master key. The best part? If you ever want to cut off a service, you can revoke its App Password instantly without affecting your main account or any other tools.
Think of an App Password as a valet key. It lets someone park your car, but it won't open the glove box or the trunk. It’s limited access for a specific task.
What Happens If My Scheduled Post Fails?
How failures are handled really depends on your setup.
If you wrote your own API script, the ball is in your court. You’re responsible for building in your own error handling and retry logic. That means writing code to catch a failed post, log what went wrong, and maybe even try again after a minute or two.
On the other hand, most commercial scheduling platforms and no-code tools have this baked in. They’ll typically send you an email or an in-app notification if something goes wrong, letting you jump in and reschedule the post manually.
How Far Ahead Can I Schedule My Posts?
This one comes down to the tool you’re using.
With a custom script hitting the API directly, the sky's the limit. Your scheduling horizon is only constrained by your own code—whether you’re using a simple cron job for next-day posts or a database to plan out content for the next year.
Most third-party SaaS schedulers let you plan weeks or even months out. The exact window you get often depends on your subscription plan. Typically, the higher the tier, the further into the future you can schedule.
Tired of managing a dozen different social APIs? With Late, you integrate once and can post to Bluesky, Threads, TikTok, and seven other platforms through a single, reliable API. Get your free key and start building at https://getlate.dev.

Miquel is the founder of Late, building the most reliable social media API for developers. Previously built multiple startups and scaled APIs to millions of requests.
View all articlesLearn more about Late with AI
See what AI assistants say about Late API and this topic