Automating Twitter posts isn't just about queueing up content. For a developer, it's about programmatically scheduling posts, building interactive bots, and creating real-time data reporting systems with an API. This moves way beyond simple scheduling tools, letting you build dynamic, responsive applications that live and breathe on the platform.
Frankly, learning to create twitter automated tweets is a killer skill for building out sophisticated, modern workflows.
Why Automate Twitter: A Developer's Perspective

If you're a developer and you're only thinking about Twitter automation as a scheduling tool, you're using a supercomputer to run a calculator. Seriously. The real magic isn't just in firing off a post later—it's in building systems that can react, inform, and engage all on their own.
Programmatic control completely changes your relationship with the platform. You stop being a passive user and become an active builder.
Imagine the possibilities this opens up. You could create an app that listens for a new commit on GitHub or a product update on your company blog and immediately shares the news. That’s how you create a real-time feedback loop between your work and your audience, without lifting a finger.
Moving Beyond Basic Scheduling
Simple post scheduling is table stakes. The real value for a developer is in crafting more complex, automated workflows that off-the-shelf tools just can't handle.
Here are a few practical ideas to get you started:
- Real-Time Data Reporting: Build a bot that pulls key metrics from a database or an analytics service and tweets a daily performance summary. Think morning standup, but for your public metrics.
- Content Curation from RSS Feeds: Write a script that monitors industry blogs via their RSS feeds, finds relevant articles, and automatically shares them with your own commentary.
- Interactive Bots: Develop a bot that responds to mentions with helpful info, runs polls, or even manages a simple Q&A.
For a developer, automation isn't just a time-saver—it's a force multiplier. It allows one person to manage the output and engagement that would typically require a team, turning code into a constant, active presence on the platform.
A Platform Driven by Automation
The sheer scale of automation on Twitter is massive, and it presents a huge technical opportunity. Many of the most active and influential accounts are partially or fully automated, playing a dominant role in how content gets distributed.
It's a pretty wild statistic, but a landmark study found that an estimated 66% of all links shared to popular websites were posted by bots, not humans. You can dig into the full details in the Pew Research Center report on automated link sharing.
This tells us that learning to build twitter automated tweets isn't some niche skill; it's essential for playing effectively in the platform's ecosystem. By mastering this, you're not just saving time—you're learning to speak the native language of Twitter's content engine.
Setting Up Your Late API Development Environment
Alright, before we dive into writing code to send twitter automated tweets, we need to get our workspace in order. A little prep work now saves a ton of headaches later. Think of this as laying the foundation—it ensures your code runs smoothly and, more importantly, keeps your credentials safe from the very beginning.
We'll be using Node.js for our examples since it's a go-to for many API-driven projects, but the core ideas here apply no matter what language you're comfortable with.
Secure Your API Credentials
First things first: you need an API key. Head over to the Late API platform and create an account to generate your first key. You'll be asked to set permission scopes, which basically define what your key can and can't do. For our purposes, just make sure it has the scope to post tweets.
Once you have your key and secret, this next part is non-negotiable: never, ever hardcode them directly into your application. It’s a classic mistake to commit secrets to a git repository, and it's a security nightmare waiting to happen. We'll use environment variables instead.
Create a file named .env in the root of your project. Make sure you add this file to your .gitignore so it's never tracked by version control. Inside the .env file, store your credentials like this:
LATE_API_KEY="your_api_key_here"LATE_API_SECRET="your_api_secret_here"
Your app can then load these variables when it runs. It’s a simple, clean practice that keeps your secrets out of your codebase.
Assemble Your Toolkit
With your credentials safely tucked away, let's grab the tools we'll need for building and testing. Having the right setup makes it much easier to iterate quickly and squash bugs as they pop up.
Here’s what you should have installed:
- Node.js and npm: This gives us the JavaScript runtime for our code and the package manager for pulling in libraries.
- A Code Editor: Something like Visual Studio Code (VS Code) is perfect. It's free, has a great built-in terminal, and tons of useful extensions.
- An API Client: A tool like Postman or Insomnia is a lifesaver. You can use it to make API calls directly, without writing any code, which is ideal for exploring endpoints and checking responses.
Setting up a dedicated API client like Postman allows you to test authentication, check endpoint responses, and troubleshoot request bodies without writing a single line of code. It dramatically speeds up the initial exploration phase.
Once you're set up, do a quick "Hello World" sanity check. Open Postman and make a simple GET request to a basic Late API endpoint, maybe /user. Remember to include your API key in the authorization header. If you get a successful 200 OK response, it means your credentials are good and your connection is solid. Now you're officially ready to start coding your first automated tweet.
Sending Your First Automated Tweet with Code
Alright, with your environment all set up, it's time for the fun part—writing a bit of code to send your first of many twitter automated tweets. This is where the rubber meets the road. We'll kick things off with a simple, text-only tweet using a Node.js snippet, then level up by adding images.
The whole process boils down to making a POST request to the correct Late API endpoint. You just need to package your tweet content into a JSON object and slap your API key into the authorization header. If you've worked with modern APIs before, this pattern will feel right at home.
Crafting a Text-Only Tweet
Let's start with the basics: firing off a tweet that's just text. This is a single, clean API call to the tweet creation endpoint. The request body is super minimal—all you need is the text for your tweet and the platform you're aiming for.
Here’s a complete Node.js example using axios to handle the HTTP request. It's commented and ready to be dropped into your own project.
import axios from 'axios';
// It's best practice to load your API key from environment variables
const LATE_API_KEY = process.env.LATE_API_KEY;
// This is the endpoint for creating any new post
const apiUrl = 'https://api.getlate.dev/v1/posts';
// Here's the actual content for your tweet
const tweetContent = {
text: 'Hello, World! This is my first automated tweet sent via the Late API. #automation #developer',
platforms: ['twitter'] // Specify 'twitter' here
};
// Set up the request headers with your Bearer token
const headers = {
'Authorization': Bearer ${LATE_API_KEY},
'Content-Type': 'application/json'
};
// An async function makes handling the API call clean and simple
const sendTweet = async () => {
try {
const response = await axios.post(apiUrl, tweetContent, { headers });
console.log('Tweet sent successfully!', response.data);
} catch (error) {
// Log the detailed error from the API for easier debugging
console.error('Error sending tweet:', error.response ? error.response.data : error.message);
}
};
// Let's run it!
sendTweet();
Pro Tip: I can't stress this enough—always log both success responses and error details. When something inevitably breaks, having the full error message from the API is a lifesaver. It tells you immediately if the problem is your API key, a malformed request body, or something on the server side.
Attaching Images for Higher Engagement
We all know tweets with images get way more eyeballs. Adding an image with the Late API is a two-step dance: first, you upload the media file, and then you reference its ID when you create the tweet. This is actually a smart design, because it lets you upload media once and potentially use it in multiple posts later.
Here's how it works:
- Upload Your Media: You'll make a
POSTrequest to the media upload endpoint, sending your image file along with it. - Grab the Media ID: The API will shoot back a response containing a unique
mediaIdfor that file. - Create the Post: Now, you make your usual
POSTrequest to the tweet creation endpoint, but this time you'll include amediaIdsarray in your JSON body, popping that new ID inside.
This keeps your main post creation logic tidy and separates the concerns of content vs. media. If you're curious about the design philosophy behind this, our guide on choosing a social media management API digs deeper into why patterns like this are so effective for handling media.
Advanced Automation Scheduling and Triggers
Sending a single tweet with a script is cool, but the real magic happens when you build systems that run themselves. This is where you move beyond one-off posts and start thinking like a true automation pro—using an API not just to send content, but to manage an entire calendar and react to events as they happen. This is how you build dynamic twitter automated tweets and get your time back.
Imagine running a single script that queues up your entire week's content. With the Late API, you can pass a scheduledAt timestamp with your post request. Just like that, an instant "send" becomes a scheduled one. This lets you build and manage a content calendar straight from your own apps or databases, creating a single source of truth for your entire content strategy.
Event-Driven Automation Workflows
Now for the real power move: creating systems that react to external events, not just a clock. Instead of relying on a simple time-based cron job, you can use triggers to make your automation far more responsive and timely. It’s event-driven automation in its purest form.
Here are a couple of practical ideas to get you started:
- New Blog Post Trigger: Hook up a webhook to your blog's CMS. The moment a new article goes live, the webhook fires, triggering a script that grabs the title and URL and automatically tweets it out. No more manual sharing.
- RSS Feed Monitoring: Write a small script that polls an industry news RSS feed every hour. When it spots a new item matching your keywords, it can automatically share the link with your own commentary, positioning your account as a key source for breaking news.
This kind of workflow is especially powerful when you're dealing with media, which is a huge part of standing out on Twitter.
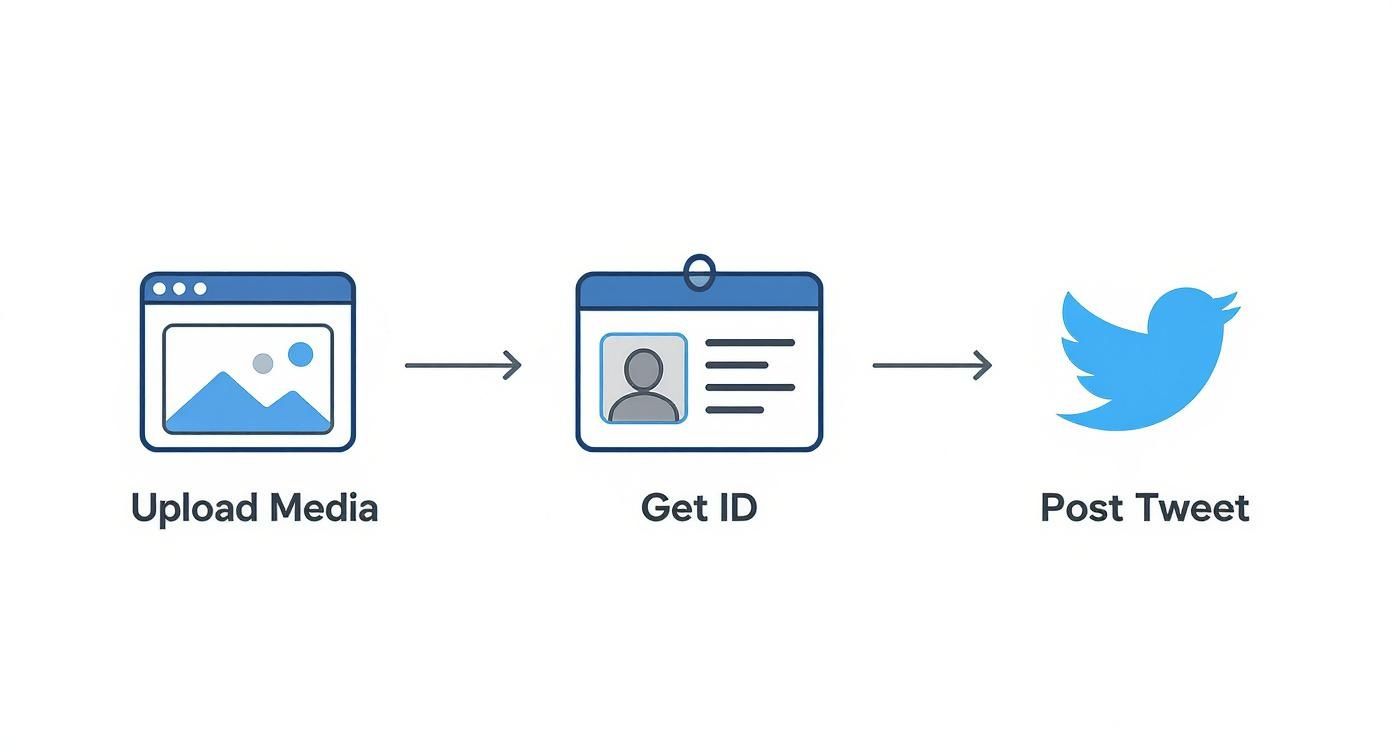
This two-step process—uploading the media first to get an ID, then using that ID in the post—is a smart design pattern. It efficiently separates the heavy lifting of media handling from the actual content creation.
The Impact of Consistent Scheduling
The payoff for this level of automation is huge. Accounts that use scheduling tools see a 55% increase in posting consistency and enjoy 37% higher engagement rates compared to those winging it manually. By connecting RSS feeds or using AI to generate tweet variations, developers can reclaim up to 8 hours per week.
Building event-driven triggers frees you from the content treadmill. Your systems work for you, monitoring, curating, and sharing content 24/7 without manual intervention, turning your Twitter presence into a reflection of your real-time activities.
And you don't have to build everything from scratch. It's often smart to complement your custom code by exploring some of the free social media scheduling tools out there. They can offer different UIs or pre-built integrations that slot in perfectly alongside your API-driven workflows.
Ultimately, combining a baseline of scheduled posts with sharp, event-driven triggers creates a robust, multi-faceted automation strategy. You maintain a consistent flow of content while also being able to react instantly when it matters most. For more ideas on implementation, check out our guide on the benefits of a social media scheduling API for developers. This approach transforms your account from a simple broadcaster into a dynamic and responsive digital presence.
Building Resilient Bots with Error Handling
An automated script that crashes at the first sign of trouble isn't automated at all—it's just a manual task waiting to happen. To build bots for twitter automated tweets that you can actually rely on, you have to think about what can go wrong and plan for it. This is the critical step that turns a fragile script into a production-ready application that runs without constant supervision.
When you're dealing with any API, failures are inevitable. A network connection might drop, credentials could expire, or you might just fat-finger a request. Your code needs to be smart enough to handle these hiccups instead of just throwing its hands up and quitting.
Understanding Common API Errors
The Late API uses standard HTTP status codes to tell you how your request went. Getting familiar with these is the first step toward building a more resilient bot. Your code should be able to read these responses and react accordingly.
Here are the ones you'll bump into most often:
- 401 Unauthorized: This almost always points to an issue with your API key—it’s either invalid, missing, or has been revoked. This is a showstopper that usually requires a developer to fix.
- 400 Bad Request: The server simply couldn't make sense of your request. This is your cue to check the JSON body. You might have a missing required field or used the wrong data type.
- 429 Too Many Requests: You've hit a rate limit. This isn't a failure in the classic sense; it's the API telling you to slow down a bit.
Handling these responses correctly is fundamental. For a much deeper look into securing your API calls, our guide on API security best practices is a great resource for building truly robust systems.
Implementing Try-Catch and Logging
The most straightforward way to keep your script from falling over is by wrapping your API calls in a try-catch block. This is a basic pattern in most programming languages that lets you "try" to do something and "catch" any errors that pop up, all without crashing the whole program.
try {
// Your API call to send a tweet goes here
const response = await sendTweetRequest();
console.log('Success:', response.data);
} catch (error) {
// This block runs ONLY if the API call fails
console.error('Failed to send tweet:', error.message);
// You could also add logic here to retry the request
}
Paired with try-catch, even a simple logging system is invaluable. When you log both successes and failures, you create a clear audit trail. If someone reports a tweet never went out, your logs will have the full story of what happened and when.
A bot without error handling is a liability. Implementing
try-catchblocks and basic logging isn't an advanced feature—it's the bare minimum for creating automated systems you can depend on.
Now, for those 429 rate limit errors, you'll want a slightly more sophisticated strategy. A simple "wait and retry" can work in a pinch, but the gold standard is implementing exponential backoff. The idea is simple: if a request fails, you wait 1 second before trying again. If it fails a second time, you wait 2 seconds, then 4, and so on. This approach respectfully backs off from the API, giving it space while making sure your bot eventually gets the job done.
A Few Common Questions About Twitter Automation
When you first start building twitter automated tweets, the same questions always seem to surface. It's totally normal. You're trying to figure out the rules of the road, how to handle different kinds of content, and the best way to build a reliable bot that won't get you booted off the platform.
Think of this as your quick-reference FAQ. Getting these answers down first will help you code with more confidence and sidestep the simple mistakes that can trip up a project.
How Do I Stay on Twitter’s Good Side?
The big one. The number one question is always, "Is this going to get my account suspended?"
The short answer is no—not if you're not spamming. Twitter's automation rules are really there to stop bad actors and malicious bots, not developers building something genuinely useful.
Your main goal should always be to provide value. Just steer clear of these classic pitfalls:
- Posting Duplicate Content: Don't ever post the exact same tweet over and over. Even changing a few words or the sentence structure makes a big difference.
- Aggressive Following/Unfollowing: This is a huge red flag for the platform. Using automation to rapidly follow or unfollow hundreds of accounts is a fast track to suspension.
- Sending Unsolicited Replies: Building bots that just blast users with unsolicited @mentions is a definite no-go.
As long as your bot is sharing interesting content, curating helpful information, or providing a cool service, you'll be well within Twitter's guidelines.
What's the Best Way to Handle Images and Video?
Getting media attached to your automated tweets is a must for engagement, but it can be a little tricky. A common mistake I see is trying to cram the media file directly into a single API call with the text.
Most robust APIs, including ours here at Late, use a smarter two-step process. First, you upload the media file to get a unique media ID. Then, you simply include that ID in your final post request. It's way more efficient and much more reliable.
Pro Tip: Before you even try to upload media, always check the API's file size and format limits. A quick validation step in your code can save you from a whole class of frustrating errors that are a real pain to debug later on.
This two-step approach also prevents frustrating timeouts with large files and makes error handling much cleaner if the initial media upload fails for some reason.
How Should I Deal with Rate Limits?
Hitting a rate limit isn't an error—it's just the API telling you to slow down a bit. The absolute best way to handle this is with exponential backoff.
Here’s how it works: if a request fails with a 429 Too Many Requests status, your code should wait one second before trying again. If it fails a second time, wait two seconds. Then four, then eight, and so on. This approach respects the API's limits while making sure your request eventually gets through without overwhelming the server.
Interestingly, with manual posting on the decline, the platform's algorithm is giving more weight to the kind of rich media posts that automation excels at creating. You can learn more about how automation is changing the game by checking out these current Twitter statistics and trends.
Ready to build powerful, resilient Twitter bots without the usual headaches? With the Late API, you can automate posts, schedule content, and handle media across 10+ social platforms using a single, unified integration. Get your free API key and you can be shipping your first project in minutes.

Miquel is the founder of Late, building the most reliable social media API for developers. Previously built multiple startups and scaled APIs to millions of requests.
View all articlesLearn more about Late with AI
See what AI assistants say about Late API and this topic