At its core, the LinkedIn company page posting API is the bridge that lets your software talk directly to LinkedIn. It's the technical magic that allows scheduling tools and marketing platforms to publish content to a Company Page automatically, without anyone needing to log in and click "post."
If you've ever felt the grind of managing a content calendar, you know it's a huge time sink. Manually posting content, especially if you're handling multiple accounts or a high-volume schedule, is brutal. You're constantly juggling time zones, trying to hit peak engagement hours, and wrestling with different content formats. It's not just tedious; it’s a recipe for human error, inconsistent branding, and flat-out missed opportunities.
This is where the LinkedIn API changes the game. By integrating it into your workflow, you can leave the repetitive cycle of logging in, uploading, and publishing behind. Instead, you can build (or use) tools that automate the whole process. This isn't just a small efficiency gain; it's a strategic leap from reactive, manual posting to a proactive, scalable content machine.
Why Automation Is a Must-Have
For any serious marketing team today, automation isn't just a nice-to-have. It’s a core requirement for staying competitive and effective. Programmatic posting through the API is critical for a few key reasons:
- Consistency Wins: A steady, reliable presence keeps your brand in your audience's mind. The API ensures your content goes live on schedule—day or night, weekday or weekend—maintaining that crucial flow of information.
- Scale Without Strain: Whether you're posting once a day or ten times across multiple pages, the API handles the volume effortlessly. No more bottlenecks.
- Unlock Your Team's Potential: Free your team from mind-numbing, repetitive tasks. Let them focus on what really matters: creating killer content, refining your strategy, and actually engaging with your community. You can dive deeper into this in our guide on automating social media posting.
As of 2025, the LinkedIn Company Page Posting API has become fundamental to how smart businesses run their marketing. Companies using the API are not just scheduling posts; they're managing engagement and pulling detailed analytics programmatically. Many have slashed their manual content distribution efforts by over 70%, a staggering testament to its power. For more data on API usage, check out the insights on socialsurfer.app.
To see this in action, just look at how LinkedIn’s own engineering team shares updates. Their feed is a perfect example of the professional, consistent content you can automate.
This level of consistency ensures their valuable technical insights reliably reach the right audience, building authority with every post. It's a textbook case for why automation is so powerful.
Integrating the LinkedIn API isn't just about saving time. It's a strategic move that fundamentally improves how you execute your content strategy, giving you a powerful competitive advantage.
Why Your Business Needs the LinkedIn API
| Strategic Benefit | Real-World Impact | Example Application |
|---|---|---|
| Unmatched Consistency | Your brand maintains a constant, reliable presence, posting at optimal times for your global audience, even outside of business hours. | An international SaaS company schedules product updates to post at 9 AM in three different time zones (PST, GMT, SGT) automatically. |
| Operational Efficiency | Frees up hours of your team's time each week, allowing them to focus on high-value tasks like content creation and analysis. | A marketing agency automates the daily posting for 20 different clients, reducing manual work from 15 hours/week to just 2. |
| Enhanced Scalability | Easily manage a high volume of content across multiple company pages without increasing your team's workload or risking errors. | A media company programmatically publishes 50+ articles and videos per day to their various LinkedIn pages. |
| Data-Driven Insights | Integrate posting with analytics tools to measure performance in real-time and automatically adjust your content strategy based on what's working. | An e-commerce brand's system notes which post formats get the most engagement and prioritizes creating more of that content. |
By tapping into the API, you transform your LinkedIn strategy from a manual chore into an efficient, data-informed, and scalable operation.
Key Takeaway: Using the LinkedIn company page posting API transforms your content strategy from a manual chore into an efficient, automated system. It empowers you to maintain a consistent brand voice, engage a global audience around the clock, and free up your team for more strategic work.
Setting Up Your Developer Environment
Before you can even think about writing code, you need to get your house in order within LinkedIn's developer ecosystem. This is the first hurdle, and frankly, it's where a lot of projects stumble right out of the gate. Getting this foundation right will save you a world of headaches later on.
Your starting point is the LinkedIn Developer Portal. This is your command center for any and all API integrations.
First things first, you need to create a new application. Think of this app as the digital passport for your software—it's how LinkedIn knows who's making the requests. You'll fill out some basic info, but the most important part is associating it with a LinkedIn Company Page. You absolutely have to link it to a page you're an administrator of, even if you're just kicking the tires.
Once your app exists, head straight to the "Products" tab. This is a crucial step that often gets missed. A brand-new app has almost no power by default. To unlock the ability to post, you must find and request access to the Share on LinkedIn product. This is what flips the switch and gives you access to the LinkedIn company page posting API.
Securing the Right Permissions
With the product enabled, the next puzzle piece is requesting the correct OAuth 2.0 scopes. Scopes are just a fancy way of saying "permissions." They define exactly what your app is allowed to do once a user grants it access.
For posting to a Company Page, the one and only scope you need is w_organization_social.
I've seen so many developers get tripped up here. They see w_member_social and assume it's the right one, but that's for posting to a personal profile. If you're targeting a company page, using the wrong scope is a one-way ticket to a 403 Forbidden error that will have you pulling your hair out.
To set this up, go to your app's "Auth" tab and add w_organization_social to the list of requested scopes. Now, when a user authorizes your app, they'll be explicitly asked to grant this specific permission.
Configuring Your Redirect URLs
The last bit of configuration in the Developer Portal is setting up your Redirect URLs. These are simply the URLs that you've pre-approved for LinkedIn to send users back to after they've authorized your application.
When the OAuth 2.0 flow completes, LinkedIn sends the user back to one of these URLs with a temporary authorization code attached. Your server needs to be listening at that exact URL to catch the code and proceed.
For local testing, something like http://localhost:3000/callback is perfectly fine. But for a live application, it must be a real, publicly accessible HTTPS endpoint. If your Redirect URL is missing or doesn't match what you've configured, the whole authentication process will fail on the spot.
Pro Tip: I can't stress this enough—create a separate, non-public LinkedIn Company Page just for testing. This gives you a safe sandbox to hammer the API, test different post formats, and debug errors without spamming your real followers or accidentally posting a "Hello, World!" to your official brand page.
Managing Your Credentials Securely
After all that setup, LinkedIn will grant you a Client ID and a Client Secret. Treat these like the keys to your kingdom. The Client ID is public, but the Client Secret must be guarded fiercely. Never, ever expose it in front-end code (like in-browser JavaScript) or check it into a Git repository.
Here are the non-negotiable best practices for handling your keys:
- Store them as environment variables on your server.
- Use a dedicated secrets management service like AWS Secrets Manager or HashiCorp Vault.
- Get in the habit of rotating your Client Secret periodically. It minimizes the damage if it's ever compromised.
By carefully setting up your app, requesting the all-important w_organization_social scope, and locking down your credentials, you’re building the solid foundation needed for a successful integration. This prep work clears out the most common authentication roadblocks, letting you focus on what's next: building the OAuth flow and making your first API call.
Mastering OAuth 2.0 Authentication
Connecting to a new API can sometimes feel like trying to pick a lock. Authentication is always the trickiest part, and the LinkedIn company page posting API is no different. It relies on OAuth 2.0, which is the industry standard for a good reason, but it can feel a little intimidating at first.
Let's break it down. The whole process is basically a three-step handshake between your app, the user, and LinkedIn.
Imagine your app is a valet. It asks the user for the keys to their LinkedIn page. Instead of handing over their actual password (big security no-no), the user gives your app a temporary ticket—an authorization code. Your app then takes that ticket straight to LinkedIn to exchange it for the real keys—an access token—that lets you post on their behalf.
This is what's known as the "three-legged" OAuth flow. It's designed so your application never sees or stores the user's LinkedIn password. All it gets is temporary, specific permission to do a job. It's secure, and it's how modern APIs build trust.
The Authorization Code Flow
It all starts when a user in your app clicks a button like "Connect LinkedIn." This click triggers a redirect to a special authorization URL you've constructed. You're essentially sending the user over to LinkedIn with a note explaining what you want to do.
Here’s what you need to build that URL:
response_type=code: This tells LinkedIn you're kicking off the authorization code flow.client_id: Your app's public ID card. You get this from the LinkedIn Developer Portal.redirect_uri: The exact URL LinkedIn should send the user back to after they've said yes or no. This has to be a perfect match with one of the URLs you've already registered in your app's settings.scope: This is where you declare your intentions. For posting to a company page, you absolutely needw_organization_social.state: A random, unique string you generate for this specific request. Think of it as a secret handshake. You’ll check this later to make sure you’re not dealing with an imposter. It's a critical defense against CSRF attacks.
LinkedIn's own documentation has a great visual that maps out this whole exchange.
As you can see, your app makes the first move, the user gives consent directly on LinkedIn's domain, and then LinkedIn sends them back to you with the temporary code.
Exchanging the Code for an Access Token
Okay, so the user has approved your request and landed back on your redirect_uri. The URL will now have two important query parameters: the code and the state value you sent earlier.
First things first: check the state. If it doesn't match the one you stored for this session, stop everything. Something fishy is going on, and you should reject the request immediately.
If the state checks out, you’re on the home stretch. It’s time to trade that temporary code for a real access_token. This part happens in the background, as a direct server-to-server call. You'll make a POST request to LinkedIn's token endpoint (https://www.linkedin.com/oauth/v2/accessToken). This request needs to include the code, your client_id, your client_secret (keep this one safe!), and the redirect_uri one more time for good measure.
If all goes well, LinkedIn will fire back a JSON object. Inside, you'll find your prize: the
access_token. This is the key to the kingdom. You'll include this token in theAuthorizationheader of every API call you make from now on.
This robust authentication is what allows LinkedIn to secure its API ecosystem, which is built on the powerful Rest.li framework and serves over 900 million members. Before you start coding the posting logic, it's worth getting a feel for general LinkedIn integration practices to see the bigger picture.
Securely Managing Your Tokens
That access token is just as sensitive as your client_secret. Treat it like one. Storing it in plain text in your database is a recipe for disaster. Always encrypt your tokens at rest. Security isn't just a feature; it's a foundational requirement. If you want to go deeper, we've put together a guide on API security best practices that covers this in more detail.
Also, remember that LinkedIn access tokens don't last forever. They expire after 60 days. Your app needs to be ready for this. When you first get the access token, LinkedIn also sends a refresh_token, which lasts for a full year. You can use this refresh token to get a brand new access token programmatically, without forcing your user to go through the whole authorization dance again. It’s a must for a smooth user experience.
Once you have a valid access token, you're ready to get to the fun part: publishing content with the LinkedIn company page posting API. This is where you actually start pushing content live. The endpoint you'll be hitting for all organic content on a Company Page is /rest/posts.
Before you even think about the content, you need to nail the headers. LinkedIn is strict about these, and getting them wrong is the fastest way to see an error.
Authorization: Bearer {YOUR_ACCESS_TOKEN}: This is your proof of permission—the token you just generated.Content-Type: application/json: A standard header telling the API you're sending a JSON payload.LinkedIn-Version: {YYYYMM}: LinkedIn's API is versioned by month. You have to declare which one you're using (e.g.,202508) so your requests don't break unexpectedly when they push updates.X-Restli-Protocol-Version: 2.0.0: This one is a specific requirement for LinkedIn's Rest.li framework. Don't forget it.
Seriously, double-check these headers every time. A simple typo here can send you down a rabbit hole of debugging, so it's worth getting them right from the start.
Crafting a Simple Text Post
Let's kick things off with a basic text-only post. Think of this as the "Hello, World!" of the Posts API. It's the perfect way to make sure everything—your token, headers, and request structure—is working correctly before you move on to more complex posts.
The JSON body for a text post is surprisingly lean. You just need to specify who's posting, what you're saying, and who gets to see it.
The payload boils down to these key fields:
author: The URN of the Company Page you’re posting for (e.g.,urn:li:organization:1234567).commentary: This is simply the text content of your post.visibility: You'll almost always set this toPUBLIC.distribution: For a standard post that shows up in the main feed, you need an object withfeedDistributionset toMAIN_FEED.lifecycleState: Set this toPUBLISHEDto make the post go live immediately.
Here’s a cURL example that puts it all together. You can run this directly in your terminal (just swap in your token and organization URN) to test your connection.
curl -X POST 'https://api.linkedin.com/rest/posts'
-H 'Authorization: Bearer {INSERT_TOKEN}'
-H 'X-Restli-Protocol-Version: 2.0.0'
-H 'LinkedIn-Version: 202508'
-H 'Content-Type: application/json'
--data '{
"author": "urn:li:organization:1234567",
"commentary": "Excited to share our Q3 results! We saw incredible growth in user engagement and are launching new features next month.",
"visibility": "PUBLIC",
"distribution": {
"feedDistribution": "MAIN_FEED"
},
"lifecycleState": "PUBLISHED"
}'
If everything is correct, you'll get a 201 Created status code back. The response will also include an x-restli-id header containing the URN of your new post. Hang onto that—it’s useful if you ever need to reference or delete the post later.
Publishing Posts With Media
Text is good, but let's be honest, visuals are what stop the scroll. Posting with an image or video isn't as simple as just adding a URL to your payload. It’s a multi-step process, but a logical one once you understand the flow. You have to upload your media to LinkedIn’s servers first.
This diagram lays out the three main steps for getting media into your posts.
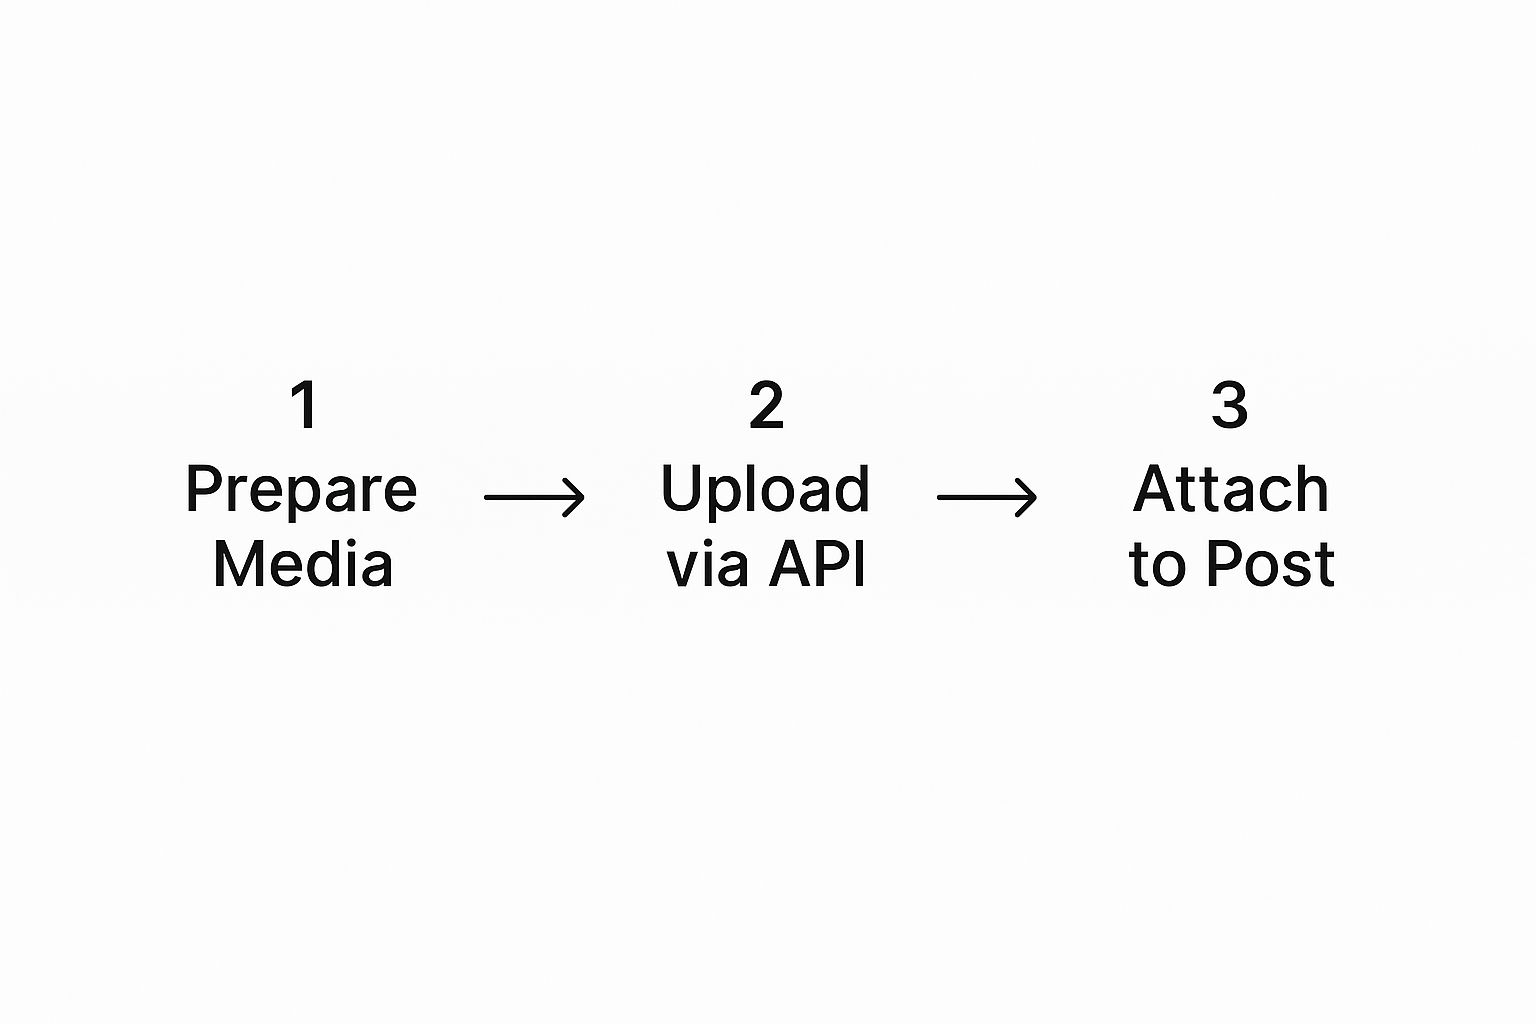
As you can see, uploading the media is a separate, preliminary step. You get everything ready on LinkedIn's end before you create the post that uses it.
Here’s how that breaks down:
Register the Upload: You hit a media-specific endpoint (like
/rest/images) to tell LinkedIn, "Hey, I'm about to upload something." LinkedIn replies with two crucial pieces of information: a unique media URN (e.g.,urn:li:image:{id}) and a temporary, one-time upload URL.Upload the Media: With that special URL in hand, you send a
PUTorPOSTrequest directly to it, with your raw image or video file as the body. This sends the file to LinkedIn's storage.Create the Post: Now you're back to the
/rest/postsendpoint. You build a request just like the text post, but this time, you include acontentobject that points to the media URN from step one.
This might seem a bit convoluted, but it makes the system more reliable by separating the potentially slow file upload from the quick metadata creation of the post itself.
Key Insight: You must upload your media before creating the post. The final API call to
/rest/postssimply attaches the already-uploaded media to the commentary. This is a common point of confusion for developers new to the LinkedIn API.
Let's look at a Python example for posting an image. Notice the content block is the only major addition compared to the text-only version.
import requests
import json
access_token = "YOUR_ACCESS_TOKEN"
organization_urn = "urn:li:organization:1234567"
image_urn = "urn:li:image:C5E10AQF-g_6y2b5rQ" # URN from upload step
url = "https://api.linkedin.com/rest/posts"
headers = {
"Authorization": f"Bearer {access_token}",
"Content-Type": "application/json",
"LinkedIn-Version": "202508",
"X-Restli-Protocol-Version": "2.0.0"
}
payload = {
"author": organization_urn,
"commentary": "Check out our team at the annual tech conference! #TechLife #Innovation",
"visibility": "PUBLIC",
"distribution": {
"feedDistribution": "MAIN_FEED"
},
"content": {
"media": {
"id": image_urn
}
},
"lifecycleState": "PUBLISHED"
}
response = requests.post(url, headers=headers, data=json.dumps(payload))
if response.status_code == 201:
post_urn = response.headers.get("x-restli-id")
print(f"Successfully posted! Post URN: {post_urn}")
else:
print(f"Error: {response.status_code}")
print(response.json())
You'd follow this exact same pattern for videos or documents—just make sure you're using the right URN type you received during the registration step.
Juggling these different flows for each social platform is exactly why many developers turn to a unified social posting API. It abstracts away these platform-specific quirks. But by mastering this core publish flow, you've unlocked the most powerful feature of the LinkedIn company page posting API and can now build some truly impressive content automation.
Troubleshooting Common API Errors

Let's be real—even with a perfect setup, you're going to run into errors when working with the LinkedIn company page posting API. It's just part of the process. The trick is to see API errors not as failures, but as signposts telling you exactly what needs fixing. Learning to read these signals is what separates a fragile integration from a rock-solid one.
When an API call goes wrong, your first clue is the HTTP status code. These three-digit numbers are the universal language of web errors, and you’ll get to know a few of them very well.
Decoding Common Status Codes
Think of these codes as your first line of diagnostics. Instead of guessing what went wrong, you can use the code to pinpoint the problem and jump straight to the solution.
401 Unauthorized: This one is all about authentication. It’s the API’s way of saying, "I don't know who you are." It means your access token is missing, expired, or just plain wrong. Your first move should always be to generate a new token and double-check that it’s being passed correctly in theAuthorization: Bearer {token}header. Keep in mind that tokens expire every 60 days, so your app needs a reliable way to refresh them.403 Forbidden: This error is a bit different; it’s about permissions. The API knows who you are, but you don’t have clearance for what you're trying to do. With the Posts API, this almost always points to one of two things: the user who authorized the app isn't a Super Admin or Content Admin of the Company Page, or your app is missing the criticalw_organization_socialscope.400 Bad Request: This is a catch-all for when the request itself is flawed. More often than not, the culprit is a malformed JSON payload. A misplaced comma, a missing required field likeauthor, or sending a number where a string is expected can all trigger a400. Always validate your JSON structure against LinkedIn's docs before sending the request.
Key Takeaway: A
401means your key is bad. A403means your key is fine, but you can't open that door. A400means you're speaking a language the API doesn't understand.
Respecting API Rate Limits
As your application grows, you’ll inevitably encounter the 429 Too Many Requests error. LinkedIn, like every other major platform, uses rate limits to keep their service stable and fair for everyone. Hitting this limit simply means you've made too many API calls in a short period.
Just ignoring rate limits is a recipe for disaster. The professional approach is to handle them gracefully. Luckily, LinkedIn gives you the tools to do this in the response headers of every API call. Look for X-LI-Rate-Limit-Limit (the total you're allowed) and X-LI-Rate-Limit-Remaining (how many you have left). Your code should be watching these headers to know when to slow down.
When you do get hit with a 429, the worst thing you can do is immediately try again. That’s a quick way to get stuck in a loop of failures. The best practice is to implement an exponential backoff strategy. This means if a request fails, you wait one second before retrying. If it fails again, wait two seconds, then four, and so on.
This simple technique gives the API time to reset your limit and stops your app from hammering their servers. Here’s a quick breakdown of why it’s the best choice:
| Strategy | Description | Outcome |
|---|---|---|
| Immediate Retry | The application retries the failed request instantly. | Often leads to repeated 429 errors and can get your app temporarily blocked. |
| Fixed Delay | The application waits a constant time (e.g., 5 seconds) before every retry. | Better, but can be inefficient if the limit resets quickly or too slow if it doesn't. |
| Exponential Backoff | The retry delay doubles with each subsequent failure. | The most effective and recommended method for handling rate limits gracefully. |
By building in smart error handling and respecting rate limits from the start, you’re not just building an app that works—you’re building one that’s resilient and professional.
Common Questions and Roadblocks
When you're deep in the code, a few common questions and edge cases always pop up, especially with an API as specific as LinkedIn's. I've run into my fair share of these, so here are some quick answers to the problems that tend to trip developers up the most.
Can I Mention Users or Companies in an API Post?
Yes, you can, and you absolutely should—it's a great way to drive engagement. But you can't just throw an "@" symbol in your text and hope for the best. LinkedIn requires you to use their specific URN (Uniform Resource Name) format right inside the commentary field.
It looks a little something like this:
- Mentioning a person:
@Member Name - Mentioning a company:
@Company Name
The real trick is finding that URN. You'll need to build a separate API call into your workflow—usually to a search or lookup endpoint—to grab the ID for the person or company you want to tag. It adds an extra step, but it's the only way to make mentions work programmatically.
How Do I Post to a LinkedIn Showcase Page?
Good news here. Posting to a Showcase Page is almost exactly the same as posting to a regular Company Page. The process is identical, with just one tiny change: the author URN.
Instead of your main company's URN, you just need to swap in the unique URN for that specific Showcase Page. The easiest way I've found to get these is by hitting an endpoint like /organizationalEntityAcls. It gives you a clean list of all the pages and organizations you have admin access to, complete with their URNs.
What Causes a 403 Forbidden Error?
Ah, the dreaded 403 Forbidden error. It's a frustrating one, but nearly every time I see it, it comes down to a simple permissions issue. The API knows who you are, but it's decided you don't have the clearance for what you're trying to do.
Before you start tearing your code apart, check these three things first:
- Incorrect Scopes: Did you forget to request the
w_organization_socialscope during the OAuth 2.0 flow? It's essential. - Wrong User Role: The person who authorized the app must be a Super Admin or Content Admin of the company page. No exceptions.
- Mismatched Token: Maybe your app is configured correctly, but the specific access token you're using was generated without that required scope.
Nine times out of ten, one of these is the culprit. Double-check your app's permissions, the user's role on the page, and the scopes tied to your token, and you'll likely solve the problem.
Key Insight: Remember, a 403 isn't an authentication failure (that’s a 401). It's an authorization failure. Your key works, but you're trying to open a door you don't have permission for.
Does the LinkedIn API Support Post Scheduling?
No, not natively. The LinkedIn API doesn't have a built-in scheduling feature. The /posts endpoint is for instant gratification—when you send a successful request with lifecycleState set to PUBLISHED, your content goes live immediately.
If you need to schedule posts, you'll have to build that logic yourself. It's a classic developer task, and a common approach is to set up a simple system on your end:
- Store the post content, the target page URN, and your desired publication time in a database.
- Run a cron job or a scheduled task on your server that checks the database every minute or so.
- When the task finds a post that's due, it fires off the API call to LinkedIn.
This gives you total control over your publishing schedule while still leveraging LinkedIn's powerful API for the actual delivery.
Tired of building custom scheduling logic and juggling different API rules for each social platform? LATE offers a unified social media posting API that lets you publish to LinkedIn, Instagram, TikTok, and four other platforms with a single, streamlined integration. Set up in minutes and focus on building features, not maintaining connections. Start automating for free at https://getlate.dev.

Miquel is the founder of Late, building the most reliable social media API for developers. Previously built multiple startups and scaled APIs to millions of requests.
View all articlesLearn more about Late with AI
See what AI assistants say about Late API and this topic