First things first, let's get one thing straight. You can't just drop a YouTube link into your Instagram Feed or Reels and call it a day. It just doesn't work that way. To get your YouTube content onto Instagram, you need to download the original video file, reformat it for Instagram’s vertical world (like 9:16 for Reels), and chop it down to meet the platform's time limits.
Why Bother Posting YouTube Videos to Instagram? It's a Game Changer.
Repurposing your long-form YouTube videos for Instagram isn’t just a clever shortcut to save time—it's a core strategy for blowing up your reach and actually connecting with people where they spend their time scrolling. Instead of grinding out brand-new content from scratch, you're squeezing every drop of value out of the hard work you’ve already put in. This keeps your brand message tight and your content in front of people, no matter which app they're opening.
The real magic is in meeting your audience where they already are. And trust me, there's a massive crossover between these two platforms.
- Massive Audience Overlap: A huge chunk of your potential Instagram audience is already hooked on YouTube’s style of content. They get it.
- Insane Reach Potential: You get to tap into Instagram's powerful discovery algorithms, especially with Reels, which can put your content in front of a whole new set of followers.
- Sky-High Engagement: Short, snappy vertical video is built for mobile. It practically begs for more likes, comments, and shares.
- Become More Efficient: You get way more mileage from a single video, taking the pressure off the endless content creation treadmill.
Tapping Into a Shared Audience
The numbers don't lie, and they tell a pretty compelling story. A staggering 76.9% of Instagram users are also active on YouTube. This means the vast majority of your IG followers are already primed and ready to watch your videos, making them the perfect audience for your repurposed clips.
When you nail down some effective content repurposing strategies, you can really start to leverage this overlap. You aren't just hunting for new followers; you're giving your existing community a new, dynamic way to engage with your brand.
And the engagement numbers are wild. Influencer-created Reels, for instance, pull in an average 2.08% engagement rate. That's nearly five times higher than the 0.42% rate for old-school video posts on the feed. It just goes to show how powerful it is to give people content in the format they actually prefer.
Aligning With Your Real Marketing Objectives
Smart repurposing is more than just a tactic; it’s a pillar of your entire marketing strategy. When you share clips of your best YouTube content, you’re not just filling your feed. You're reinforcing your brand's message and creating a funnel that drives people back to your main channel. It's about building a cohesive content ecosystem that actually works toward your goals.
By treating each platform as a unique touchpoint in a larger customer journey, you transform a one-off YouTube video into a multi-faceted campaign that builds authority and keeps your brand top-of-mind.
This multi-platform approach is crucial for building a brand that lasts. It ties directly into setting and hitting specific social media marketing goals, whether you're trying to boost brand awareness, send traffic to your website, or generate new leads. The whole point is to make your content work smarter, not harder.
Manually Prepping Your YouTube Video for Instagram
Automated workflows are fantastic, but let's be real—sometimes you just need to get your hands dirty to nail the perfect clip. Going manual gives you total creative control, ensuring every frame aligns with your brand and feels native to Instagram. This is all about precision, from grabbing the source file to adding those final, platform-specific touches.
First things first: you need the video file. If you’re the original creator, the cleanest way is to pop into your YouTube Studio, head to the 'Content' tab, and download the original file you uploaded. This guarantees you're starting with the highest possible quality, free from any weird compression artifacts.
No original file? No problem. You'll need a YouTube downloader. Just be careful and pick a reputable service to avoid any malware headaches. The goal is simple: get a clean MP4 or MOV file on your machine, since those are the formats Instagram plays with best.
Reshaping Your Video for a Vertical World
With the file in hand, it's time to reformat. A standard 16:9 YouTube video looks pretty clumsy on Instagram, a platform built for vertical screens. The mission here is to convert it to a 9:16 aspect ratio so it fills the screen on Reels and Stories, grabbing maximum attention.
You don’t need a Hollywood budget for this. Plenty of accessible tools will do the trick:
- On Desktop: Software like CapCut or the free version of DaVinci Resolve gives you powerful features for resizing and trimming.
- On Mobile: Apps like InShot or even Instagram's own editor are surprisingly capable for quick jobs.
Remember, resizing isn't just about cropping—it's about reframing the action. You have to decide what part of that wide shot is most important and keep it centered in the new vertical frame. This might mean getting hands-on in your editor, panning and scanning to follow the key subject.
This diagram breaks down the basic flow: grabbing the video from YouTube, giving it a makeover, and getting it ready for an Instagram post.
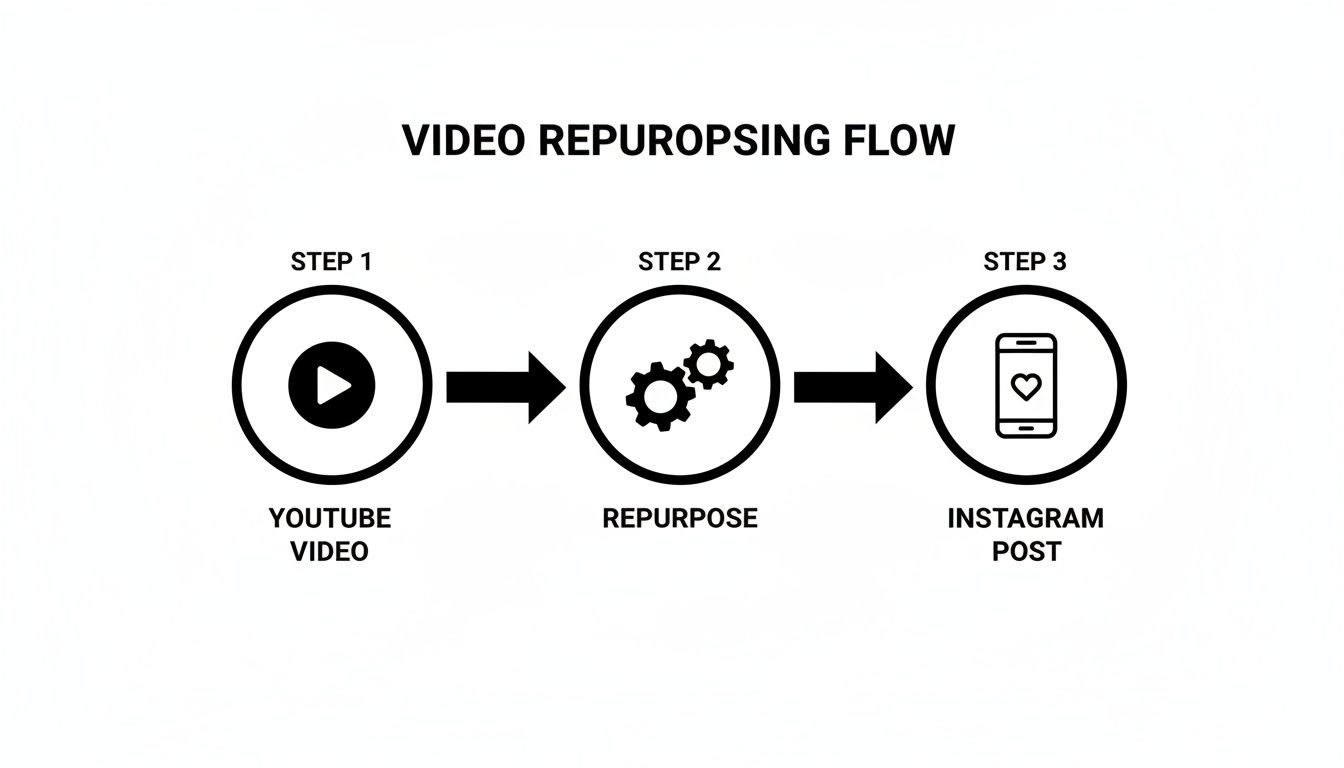
As you can see, the "repurpose" step is where the magic really happens. That's where all the critical editing and reformatting takes place.
Trimming for Impact and Platform Limits
Now that your video looks the part, it's time to cut it down. Instagram has some hard limits on length, but more importantly, you're fighting for every second of viewer attention. Your clip needs to be both compliant and ridiculously compelling.
Here’s a quick rundown of the time limits:
- Instagram Reels: Up to 90 seconds. This is your sweet spot for punchy, shareable clips.
- Instagram Stories: Up to 60 seconds for each story. You can always string a few together to tell a longer tale.
- Instagram Feed Videos: Can go up to 60 minutes, but honestly, shorter clips of 1-3 minutes almost always perform better.
The key isn't just cutting your video to fit. It's about finding the absolute best snippet—the "aha" moment, the killer punchline, or the single most important tip—and turning that into a standalone piece of content.
Finally, add those native touches that make all the difference. Generate captions right in your editor or within Instagram itself; it’s a must, considering 85% of users watch videos with the sound off. Use Instagram’s text overlay to add a hooky headline or highlight key takeaways. These final tweaks make your repurposed video feel like it was born on Instagram, which can massively boost its chances of taking off.
Automating Your Workflow with a Social Media API
Manual editing gives you total control, which is great. But when you’re juggling multiple clients or a high-volume content calendar, it just doesn't scale. This is where a unified social media API becomes your most valuable asset.
It’s the difference between tedious, hands-on tasks and an efficient, programmatic workflow.
Imagine automatically grabbing your latest YouTube video, reformatting it for Instagram Reels, and scheduling it to post during peak hours—all without ever opening an editing app. This isn't just a convenience; it's a powerful way to reclaim your time and keep your brand consistent. An API is the bridge that lets your systems talk directly to social networks.
The Power of a Single API Endpoint
The old way of doing this involved juggling separate, clunky integrations for each platform. You’d need one for YouTube, another for Instagram, and so on. It creates a messy, high-maintenance system that’s guaranteed to break the moment one platform updates its policies.
A unified API, on the other hand, consolidates everything into a single, clean endpoint. This means you can manage it all—fetching, reformatting, and scheduling—through one set of commands. Instead of your team having to learn the quirks of multiple platforms, they only need to master one integration.
This screenshot of an API documentation page is where developers start building these automated workflows.
You can see how different functions are organized into clear endpoints, making it simple for a developer to find exactly what they need to build a custom solution.
For developers and agencies, this approach is a game-changer. It cuts down development time and ongoing maintenance in a big way. To really streamline your process, looking into options for scalable marketing automation is a smart move. When you need to post a YouTube video to Instagram at scale, a unified API is the most reliable way to get it done.
How API Automation Works in Practice
Let’s walk through a real-world example. Say you want to automatically create an Instagram Reel from every new YouTube video you publish. Your script or application would handle a few key steps:
- Monitor Your Channel: The script uses an API to keep an eye on your YouTube channel for any new uploads.
- Fetch the Video File: As soon as a new video is detected, the API grabs the high-resolution source file.
- Reformat and Transcode: The script then gets to work on the video—cropping it to a 9:16 aspect ratio, trimming it to a 60-second highlight, and making sure it's in an Instagram-friendly format.
- Upload and Schedule: Finally, the script uses the API to upload the new Reel to Instagram, complete with a caption, relevant hashtags, and a scheduled post time.
This entire process hums along in the background, with zero manual work needed after the initial setup. It’s incredibly powerful because it connects your content strategy directly to your distribution channels.
A well-implemented API workflow doesn't just save time; it creates a reliable content pipeline that operates 24/7, ensuring you never miss an opportunity to engage your audience.
This level of automation is especially crucial when you consider the massive reach of platforms like Instagram. Instagram ads alone hit 1.68 billion users monthly, covering 20.3% of the global digital population. When you take a YouTube upload and slice it into IG Reels or Stories, you're tapping into a huge, overlapping audience. Tools like Late make this frictionless by consolidating endpoints for YouTube and IG, so developers can skip the platform-specific headaches.
If you’re a developer exploring this path, you'll find that different APIs offer various levels of functionality. Our guide on the top 10 social media APIs for developers can help you compare options and find the best fit for your project.
Building a No-Code Automation with Zapier or N8n
Okay, so an API is great if you're a developer, but what if you want all that automated power without writing a single line of code? This is exactly where no-code platforms like Zapier and n8n come into play. Think of them as the digital glue connecting all your different apps.
These tools let you build powerful, automated "workflows" (or "Zaps") that handle all the repetitive stuff for you. For a creator, this is huge. You can set up a system that sees your new YouTube video, grabs it, and kicks off the entire process of getting it ready for Instagram—all while you're doing something else.

With this approach, you can easily post a YouTube video to Instagram automatically. It turns a manual, multi-step headache into a true set-it-and-forget-it operation.
Setting Up Your No-Code Trigger
Every automation has to start somewhere, and that's the "trigger." This is just the event that tells your workflow, "Hey, time to get to work!"
In our case, the trigger is simple: a new video gets published on your YouTube channel. Both Zapier and n8n have fantastic YouTube integrations that make this step a breeze.
You just connect your YouTube account and tell the platform what to watch for. Once it's authenticated, it'll keep an eye on your channel 24/7. The moment a new video goes live, the workflow springs into action, grabbing the video's URL, title, description, and other details to pass along to the next step.
The Intermediary Action Steps
This is where the magic really happens. You can't just send a YouTube link straight to Instagram—it wouldn't work. The video needs to be downloaded, reformatted for a vertical screen, and probably trimmed down. Your no-code workflow needs a few middle steps to handle this transformation.
Here's a common sequence you can build out:
- Video Processing: Use a cloud video service to download the YouTube video using the URL from the trigger step.
- Reformatting: That same service can then automatically resize the video to a vertical 9:16 aspect ratio and trim it to the perfect length for a Reel or Story.
- Cloud Storage: The freshly formatted clip gets saved to a cloud storage service like Google Drive or Dropbox for a moment.
This sequence makes sure the video file is perfectly prepped for Instagram, and it all happens behind the scenes. You're essentially building a tiny, automated video editor that runs in the cloud. Learning how to daisy-chain services like this is a fundamental skill for anyone building a modern social media automation platform.
The Final Action: Posting to Instagram
With your perfectly formatted video clip sitting in cloud storage, the final step is to push it live. This is your "action" step. You'll use an Instagram integration (like Late's own app for Zapier or n8n) to wrap things up.
This final part of the workflow will:
- Grab the reformatted video file from your Google Drive or Dropbox.
- Pull in data from the original YouTube trigger—like the video's title—to pre-populate your Instagram caption.
- Upload the video directly to Instagram as a Reel or Feed post.
- You can even schedule it for a specific time to hit your peak engagement window.
By chaining these simple trigger-and-action steps together, you create a robust content pipeline. A video goes live on YouTube, and minutes later, a perfectly optimized version appears on your Instagram, driving traffic and engagement with zero manual effort.
This method really levels the playing field, giving everyone from solo creators to marketing teams the ability to build incredibly efficient cross-posting systems. You get all the power of an API-driven workflow without ever needing to touch a code editor. It's a game-changer for reclaiming your time and making sure your content gets the reach it deserves.
Optimizing Your Instagram Posts for Maximum Engagement
Getting your video onto Instagram is just the first domino. The real win is making people actually stop scrolling, watch your clip, and engage with it. This is where you move from just uploading content to thinking like a creator.
Your caption is the most powerful tool in your arsenal. Don't just rehash what the video is about. Instead, ask a pointed question, drop a surprising stat from the clip, or prompt your followers to share a related story. Remember, that first line is everything—it's your hook to convince someone to invest their next 60 seconds. Make it count.
Visuals matter, too, even after the video is prepped. A custom thumbnail isn't just a YouTube thing; it's essential for grabbing attention on the Instagram Feed. Whip up a simple but bold cover image using your brand colors and some clear, easy-to-read text. It needs to stand out in a sea of other posts.
Fine-Tuning Your Post for Discovery
To break out of your own follower bubble, you need to play nice with Instagram’s discovery features. This is about more than just the content itself.
- Strategic Hashtags: Ditch the generic tags like
#video. Seriously, they do nothing. Your goal is to find a smart mix of niche, community, and trending hashtags that are hyper-relevant to your video's topic. A good starting point is a blend of 5-10 highly specific tags that will attract the right audience, not just any audience. - Location Tagging: Is your content tied to a specific city, event, or landmark? Tag the location. It's a ridiculously simple click that can give you a massive boost in local visibility.
- Tag Relevant Accounts: If you mentioned any brands, creators, or collaborators in your video, tag them in the post. It’s not just about giving credit; it notifies them, opening the door for a reshare that can put your content in front of a whole new audience.
The most overlooked optimization secret is timing. Posting when your specific audience is most active can dramatically increase initial velocity—the likes and comments a post gets right after publishing—which signals to the algorithm that your content is valuable.
Dive into your Instagram Insights to pinpoint when your followers are actually online and scrolling. When you post a YouTube video to Instagram, syncing up your publish time with these peak hours is a low-effort tweak that delivers huge returns. It's these small, strategic moves that transform a simple video upload into a powerful asset that connects with viewers and helps grow your account.
Common Questions About YouTube to Instagram Repurposing
Even with a solid game plan, you're bound to run into a few specific questions. I've seen these pop up time and time again, so let's tackle the most common hurdles creators face when moving content from YouTube over to Instagram.
Can I Post a Full YouTube Video to Instagram?
Technically, you can. Instagram Feed videos can run up to 60 minutes long. But should you? Almost never. It's just not how people consume content there.
The real wins come from slicing your long-form videos into high-impact, snackable clips. Think about turning your best moments into:
- Reels: Up to 90 seconds of pure engagement.
- Stories: Up to 60 seconds per slide, perfect for quick updates or behind-the-scenes content.
These vertical formats are built for the phone in your hand. They're far more likely to grab attention, get shared, and actually perform well in Instagram's algorithm.
What Is the Best Video Format for Instagram?
To keep your videos looking sharp and avoid frustrating upload errors, you'll want to stick to the ideal technical specs. The best format is an MP4 file, encoded with H.264 for video and AAC for audio. Pretty standard stuff.
The more critical piece is the aspect ratio. A 9:16 vertical video is the undisputed champion for both Reels and Stories. It fills the entire screen on a mobile device, creating a much more immersive experience. While you can get away with 4:5 or 1:1 on the Feed, always default to vertical to match how people are actually using the app.
How Do I Avoid Copyright Issues When Reposting?
This one's simple, but it's the most important rule of all: only post content you own. This entire guide is about repurposing your own YouTube videos. Grabbing someone else's content and reposting it without their explicit, written permission is a fast track to getting your account flagged or worse.
And don't forget about the audio. If your original YouTube video has copyrighted music in the background, Instagram's automated system is almost guaranteed to catch it. That can lead to your video being muted, blocked in certain countries, or taken down completely.
To stay safe, either use royalty-free music from a trusted source or, even better, just pick a trending track from Instagram’s own library of licensed sounds when you're editing your Reel or Story.
Tired of the manual post-and-pray cycle? If you're ready to build a real content machine, Late offers a single, unified API to automate your scheduling across every major social platform. See how Late can save you hundreds of development hours.

Miquel is the founder of Late, building the most reliable social media API for developers. Previously built multiple startups and scaled APIs to millions of requests.
View all articlesLearn more about Late with AI
See what AI assistants say about Late API and this topic